Boxstarter

Peering into the future of windows automation testing with Chef, Vagrant and Test-Kitchen – Look mom, no SSH! by Matt Wrock

tablet_converge

Update: see this post for the latest update on getting up and running with Test-Kitchen on windows.

Linux automation testing has been supported for a while now using many great tools like chef, puppet, Test-KitchenServerSpec, MiniTest, Bats, Vagrant, etc. If you were willing to install an SSH server on Windows, you could get most of these tools to work but if you wanted to stay “native” you were on your own.

Pictured above: Testing node convergence on an 8 inch tablet.

I’m not at all morally opposed to installing SSH on windows. I love SSH. We spoon regularly. But while SSH is “just there” on linux, it incurs an extra install step for windows that must either be done manually or included in initial provisioning or image creation. Also, for some windows-only shops, the unfamiliarity of SSH may add a layer of unwanted friction in an automation ecosystem where windows is often an after thought.

Well recent efforts to make Windows testing a first class experience are beginning to take shape. Its still early days and some of the bits are not yet “officially” released but are available to use by pulling the latest bits from source control. I know…I know…to many that will still spell “friction” in bold. However, I want to share that one can today test windows machine builds via winrm with no SSH server installed, and I also want to offer a glimpse to those who prefer to wait until everything is fully baked of what is to come, and inform you that the wheels are in motion so please keep abreast of these developments.

Note: I presented much of this material and several Boxstarter demos to the Philadelphia PowerShell User Group last week, the video is available here.

Its not automated until it is tested

I work for CenturyLink Cloud and infrastructure automation is front and center to our business. Like many shops, we have a mixed environment and central to our principals is the belief that testing our automation is just as important as building our automation. In fact they are not even two separate concepts. Untested automation is not finished being built. So I am going to share with you here how we test our Windows server infrastructure along with some other bits I have been working with on the side.

Vagrant

If you have not heard of Vagrant, just stop reading right now and mosey on over to http://vagrantup.com. Vagrant is a hypervisor agnostic way of spinning up and provisioning servers that is particularly suited for developing and testing. It completely abstracts both the VM infrastructure as well as many possible provisioning systems (chef, puppet, plain shell scripts, docker and many many more) so that one can provision and share the same machine among a team using different platforms.

To illustrate the usefulness here, where I work we have a diverse team where some prefer MACs, others work on Windows and others (like myself) run a Linux desktop. We use Chef to automate our infrastructure and anyone who needs to create or edit chef artifacts needs all sorts of dependencies installed with specific versions in order to be successful. Vagrant plays a key role here. Anyone can download our Ubuntu 12.04 base image via VirtualBox, VMWare or Hyper-V and then use its Chef provisioner plugin to build that image to a state that mirrors the one used by the entire team. all this is done by including a small file of metadata that serves as a pointer to here the base images can be found as well as the chef recipes. If this sounds interesting, again I refer you to Vagrant’s documentation for the details What I want to point out here is its windows support.

Added support for WinRM and Hyper-V

Until fairly recently, Vagrant only supported SSH as a transport mechanism to provision a VM. It also lacked official Hyper-V support as a VM provider. This changed in version 1.6 with a WinRM “Communicator” and a Hyper-V provider plugin included in the box. While I don’t really use Hyper-V at work, I have some windows based personal projects at home and I prefer to use Hyper-V. So I quickly tested out this new plugin and was happy to see it available. There are still some kinks in the current version but work is underway to improve the experience. I’m trying to to personally contribute to issues that are blocking my own work and a couple have been accepted into Vagrant Master. Overall that has been a lot of fun. Here are the issues that have come up for me:

  • Only .vhdx image files are supported and .vhd files cannot be imported. I hit a wall with this when trying to use the .vhd files freely available for testing here on Technet. I have since added a patch which has been accepted to fix this.
  • Generation 2 Hyper-V VMs are imported as Generation 1 VMs and fail to boot. Oddly, most .vhdx images tend to be generation 2. My PR for this issue was just accepted yesterday.
  • Synced folders over SMB (this is the norm for a windows host/windows guest setup) fail. I’m hoping my PR for this issue is accepted.

If these same issues become blockers for you, the first two can be immediately fixed by pulling the latest copy of Vagrant’s master branch and copying the lib and plugin directories onto the installed version and you are welcome to pull my smb_sync branch which includes all of the fixes:

git clone -b smb_sync https://github.com/mwrock/vagrant
copy-item -path vagrant\lib `
  C:\HashiCorp\Vagrant\embedded\gems\gems\vagrant-1.6.3 `
  -recurse -force
copy-item -path vagrant\plugins `
  C:\HashiCorp\Vagrant\embedded\gems\gems\vagrant-1.6.3 `
  -recurse -force

Having worked with Vagrant for the past few months, I’ve been finding myself wishing there was a remote powershell equivilent to the vagrant SSH command which drops you into an ssh session on the guest box. So today I banged out a first draft of a vagrant ps command that does just that and will submit once it is more polished. You can expect it to look like this:

C:\dev\vagrant\win8.1x64> vagrant ps
default: Creating powershell session to 192.168.1.14:5985
default: Username: vagrant
[192.168.1.14]: PS C:\Users\vagrant\Documents>

A base box for testing

I’ve been playing with creating windows vagrant boxes. Unfortunately for Hyper-V, the vagrant package command is not yet implemented so I have to “manually” create the base box. Perhaps I’ll work on an implementation for my next contribution. My Windows 2012R2 Hyper-V box requires all the above fixes to install without error. You could use this Vagrantfile to test:

# -*- mode: ruby -*-
# vi: set ft=ruby :

VAGRANTFILE_API_VERSION = "2"
Vagrant.configure(VAGRANTFILE_API_VERSION) do |config| 
  config.vm.box = "mwrock/Windows2012R2"
  config.vm.box_url = "https://vagrantcloud.com/mwrock/Windows2012R2/version/1/provider/hyperv.box"
  # Change "." below with your own folder you would like to sync
  config.vm.synced_folder ".", "/chocolateypackages", disabled: true
  config.vm.guest = :windows 
  config.vm.communicator = "winrm"
  config.winrm.username = "administrator"
  config.winrm.password = "Pass@word1"
end

Note here that you need to specify :windows as the guest. Vagrant will not infer that on its own nor will it assume you are using winrm if you are using a windows guest so make sure to add that to your boxes as well if you intend to use winrm.

Test-Kitchen

Test-Kitchen is a testing framework most often used for testing Chef recipes (hence – kitchen). However I understand it is also compatible with Puppet as well. Like many tools in this space such as Vagrant above, it is highly plugin driven. Test-Kitchen by itself doesn’t really do much. What Test-Kitchen brings to the table (Ha Ha! I said table. get it?) is the ability to bring together a provisioning configuration management system like Chef and Puppet, a myriad of different cloud and hypervisor platforms and several testing frameworks. In the end it will spin up a machine, run your provisioning code and then run your tests. Further you can integrate this in your builds providing quick feedback as to the quality of your automation upon committing changes.

“Official” support for windows guests coming soon

Currently the “official” release of Test-Kitchen does not support winrm and must go through SSH on windows. However, Salim Afiune (@afiune), a developer with Chef has been working on adding winrm support. I have plumbed this into our Windows testing at CenturyLink cloud and have also used it developing my Boxstarter cookbook, which allows one to embed boxstarter based powershell in a recipe and provides all the reboot resiliency and windows config functions available in Boxstarter core. Salim has also contributed corresponding changes to the vagrant and EC2 Test-Kitchen drivers.

At CenturyLink, we use vmware and a customized vsphere driver to test with Test-Kitchen. It was trivial to add support for Salim’s branch.. With the Boxstarter cookbook, I use his vagrant plugin without issue. According to this Chef blog post, all of this windows work will likely be pulled into the next release of Test-Kitchen.

But I just cant wait. I must try this today!

So for those interested in “kicking the tires” today, here is how you can install all the bits needed:

cinst chefdk
cinst vagrant

git clone -b transport https://github.com/afiune/test-kitchen
git clone -b transport https://github.com/mwrock/kitchen-vagrant 

copy-item test-kitchen\lib `
  C:\opscode\chefdk\embedded\apps\test-kitchen ` 
  -recurse -force
copy-item test-kitchen\support `
  C:\opscode\chefdk\embedded\apps\test-kitchen `
  -recurse -force
copy-item -Path kitchen-vagrant\lib ` 
  C:\opscode\chefdk\embedded\lib\ruby\gems\2.0.0\gems\kitchen-vagrant-0.15.0`
  -recurse -force 

cd test-kitchen
gem build .\Test-kitchen.gemspec
chef gem install test-kitchen-1.3.0.gem

This will install the Chef Development Kit and vagrant via Chocolatey and I’m assuming you have chocolatey installed. Otherwise you can download these from their respective download pages here and here. Then it clones the winrm based test-kitchen and kitchen-vagrant projects and copies them over the current bits.

Note that my instructions here are assuming you are testing on Windows. However, the winrm functionality is most certainly capable of running on Linux as I do at work. If you were doing this on Linux, I’d suggest running bundle install and bundle exec instead of copying over the chef directories. However this has caused me too many problems on Windows to recommend to others and purely copying the bits has not caused me any problems.

Hyper-V

Now you can pull down the boxstarter cookbook to test from https://github.com/mwrock/boxstarter-cookbook. If you run Hyper-V, you will want to install my vagrant fixes according to the instructions above since the box inside the boxstarter cookbook’s kitchen config is on a vhd file. You can then simply navigate to the boxstarer cookbook directory and run:

kitchen test

This will build a win 2012 R2 box and install and test a very simple cookbook via Test-Kitchen.

Virtual Box

If you run VirtualBox, you will need to make a couple changes. Replace the VagrantfileWinrm.erb content with this:

# -*- mode: ruby -*-
# vi: set ft=ruby :

VAGRANTFILE_API_VERSION = "2"
Vagrant.configure(VAGRANTFILE_API_VERSION) do |config| 
  config.vm.box = "<%= config[:box] %>"
  config.vm.box_url = "<%= config[:box_url] %>"
  config.vm.guest = :windows 
  config.winrm.username = "vagrant"
  config.winrm.password = "vagrant"
  config.winrm.port = 55985
end

You would also replace the .kitchen.yml content with:

The test included in the boxstarter cookbook is not very interesting but illustrates that you can indeed run kitchen tests against windows machines with no ssh installed.

---
driver: 
  name: vagrant 

provisioner: 
  name: chef_zero 

platforms: 
  - name: windows-81 
    transport: 
      name: winrm 
      max_threads: 1 
    driver: 
      port: 55985 
      username: vagrant 
      password: vagrant 
      guest: :windows 
      box: mwrock/Windows8.1-amd64 vagrantfile_erb: VagrantfileWinrm.erb 
      box_url: https://wrock.blob.core.windows.net/vhds/win8.1-vbox-amd64.box 

suites: 
  - name: default
    run_list: 
      - recipe[boxstarter_test::simple] 
    attributes:

Looking at a more interesting ServerSpec test

For those reading who might want to see what a more interesting test would look like, lets take a look at this Chef recipe:

include_recipe 'boxstarter::default'

boxstarter "boxstarter run" do
  password 'Pass@word1'
  code <<-EOH
    Update-ExecutionPolicy Unrestricted
    Set-WindowsExplorerOptions -EnableShowHiddenFilesFoldersDrives `
      -EnableShowProtectedOSFiles -EnableShowFileExtensions 
    Enable-RemoteDesktop
    cinst console2
    cinst IIS-WebServerRole -source windowsfeatures

    #Install-WindowsUpdate -acceptEula
  EOH
end

This is a sample recipe I include with the Boxstarter cookbook but I have commented out the call that runs windows updates. This recipe will run the included Boxstarter resource and perform the following:

  • Update the powershell execution policy

  • Adjust the windows explorer settings

  • enable remote desktop

  • install the console2 command line console

  • Install IIS

Here is a test file that will check most of the items changed by the recipe:

require 'serverspec'

include Serverspec::Helper::Cmd
include Serverspec::Helper::Windows 

describe file('C:\\programdata\\chocolatey\\bin\\console.exe') do
  it { should be_file }
end

describe windows_feature('Web-Server') do
  it{ should be_installed.by("powershell") }
end

describe windows_registry_key(
  'HKEY_CURRENT_USER\Software\Microsoft\Windows\CurrentVersion\Explorer\advanced') do
  it { should have_property_value('Hidden', :type_dword,'1') }
end

describe command('Get-ExecutionPolicy') do
  it { should return_stdout 'Unrestricted'}
end

Serverspec provides a nice Ruby DSL for testing the state of a server. Although the test is pure ruby code, in most cases you don’t really need to know ruby. Familiarity with the cut and paste features will be very helpful so please review those as necessary.

The documentation on the ServerSpec.org page does a decent job of describing the different resources that can be tested. Above are just a few:  a file resource, windows feature resource, a windows registry resource and a command resource that you can use to issue any powershell necessary to test your server.

All of these tests, as we do at CenturyLink can be fed into a Continuous Integration server (Jenkins, TeamCity, TFS, etc.) to give your team speedy feedback on the state of your automation codebase.

I hope you find this helpful and I look forward to these features making it into the official vagrant and test-kitchen installs soon.

Released Boxstarter v2.4: Test Runner for Chocolatey Packages and many more Windows GUI configuration functions by Matt Wrock

boxLogoCheckThis week I released Boxstarter version 2.4. This release introduces a new feature for testing packages, the addition of many more Windows GUI configuration functions and several bug fixes and minor enhancements.

Windows GUI Configuration Functions

Boxstarter gives great thanks to Gary Park (@gep13) who provided the pull requests delivering these functions. These are a great addition to the value provided by Boxstarter to script your box so that it not only has what you want but also looks just the way you want it. Its not always easy to remember where to right click or how to “swipe” to find the settings that make your environment the most productive place for you to get things done. Here is a list of the new functions:

  • Enable/Disable showing charms when mouse is in the upper right corner
  • Enable/Disable switching apps when pointing in the upper left corner
  • Enable/Disable the option to launch powershell from win-x
  • Enable/Disable boot to desktop
  • Enable/Disable desktop background on the start screen
  • Enable/Disable showing the start screen on the active display
  • Enable/Disable showing the Apps View by default on the start screen
  • Enable/Disable searching everywhere in apps view. Not just apps.
  • Enable/Disable showing desktop apps first in results
  • Lock/Unlock task bar
  • Change taskbar icon size
  • Change location of taskbar docking

You can find the exact function names and syntax examples here.

Testing Packages and Continuous Package Delivery

A new Boxstarter module has been added, Boxstarter.TestRunner, that can test either specific packages or all packages in a repository that have versions greater than what is published. Boxstarter can be configured to test these packages on one or more “deployment targets” to determine if the package installs are successful. Boxstarter can also be configured to publish a package to its feed if it installed successfully on all deployment targets.

The Boxstarter.TestRunner module includes some powershell scripts and an MSBuild project file that can be used to integrate with modern build servers enabling scenarios where newly committed packages and package changes are automatically tested and published. They can be tested on multiple targets perhaps with different versions of windows and all of this can be done in the cloud. If testing on Azure VMs, Boxstarter can shutdown the VMs when testing is complete so you only incur costs while tests are being performed.

Details on how to use the test runner both interactively and with different build server scenarios are documented here.

Personal Case Study using Visual Studio Online Build Services to detect changes and deploy to Azure VMs and finally publish to the public Chocolatey feed

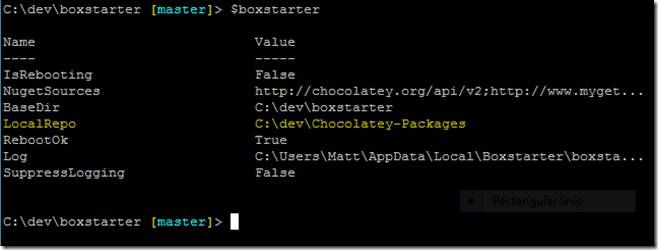
I have a git repository of almost 50 Chocolatey packages that I keep on Github. I have installed the Boxstarter.TestRunner module which is a separate install from the core set of Boxstarter modules. I have configured Boxstarter to point to my local copy of this repository:

image

I have also configured the Boxstarter.TestRunner’s deployment options to use both a windows 2012 and a 2008 R2 Azure VM for testing. Before each test, Boxstarter will snap the VMs to a preset checkpoint labeled TestReady that I created with the Boxstarter.Azure module.

image

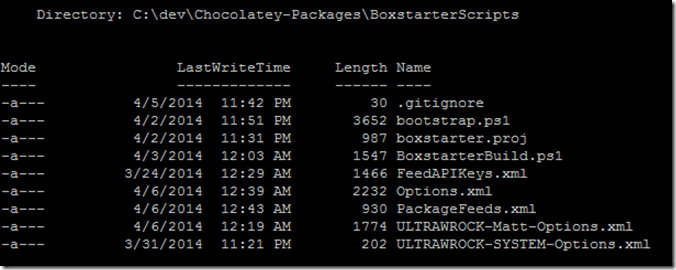
Furthermore I took an extra step of adding the Boxstarter.TestRunner build scripts to my repo using the Install-BoxstarterBuildScripts command which created a new folder in my repository to hold these scripts and persist my settings:

image

These files contain scripts that can bootstrap Boxstarter on a build server, test changed packages and publish successful packages. The xml files hold my options. Some of these, Boxstarter adds to my .gitignore file because they have VM credentials and Nuget API keys that I would not want kept in my public github repo.

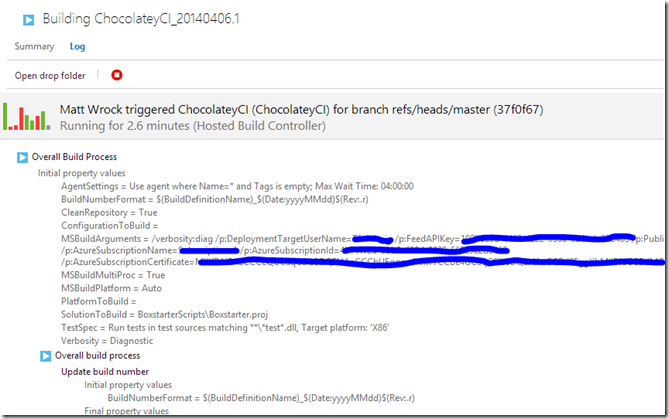
Earlier today I received a great Pull Request on three Visual Studio 2013 packages that allow for one to pass additional install arguments and a product key through the Chocolatey installer. I merged those in but before pushing to my github repository I pushed to a special Remote I keep at my VisualStudio.com account. Anyone can sign up for a VisualStudio.com account for free that supports a team of 5 or fewer members. This gets you private git or tfsvc repositories, work item tracking and a hosted build server. You can also pay for more team members and services. I have a CI build definition setup to build commits to this repository named ChocolateyCI. Almost immediately after my push, a build begins. This calls the Boxstarter.proj MSBuild files which runs BoxstarterBuild.ps1 to orchestrate the testing and publishing using the Boxstarter modules.image

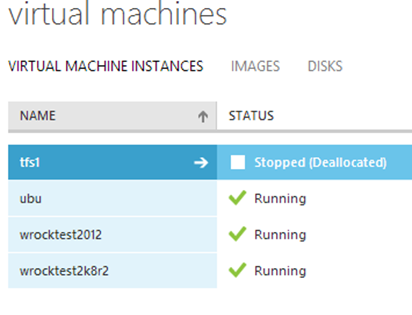
I have hidden it away but I have configured my Build Definition with all of the information it needs to establish a connection with my VMs using the Boxstarter.Azure module and run my packages on my VMs. I can see that my Azure VMs, wrocktest2012 and wrocktest2k8r2, have been fired up to test the committed changes:

image

Lets quietly sneak in to one of the VMs and just make sure they really are testing:

imageYep. They are diligently testing my packages.

Now unfortunately I can tell you right now that this build is doomed for failure. This is why: the Visual Studio Online hosted build controllers limit builds to an hour. I have 3 changed Visual Studio packages running sequentially on two small VM instances that have to restore their image before each test. That will certainly take longer than an hour. The hosted build solution is ideal for most packages but not multiple visual studio tests. That’s OK. I have other options. I have another VM that is a dedicated build server. I could push my repo to the remote watched by that server and my build can take as long as it needs. There are different configuration issues to take into consideration when working with a hosted build server like Visual Studio Online or your own private build server. These are documented on the Boxstarter.org doc pages.

For a faster and simpler option, I can test and publish locally on my local Hyper-V instances. That will be a lot faster because these VMs are beefier and the Hyper-V checkpoint restores are much faster than an Azure VM image blob restore. Even simpler, and Boxstarter’s default behavior, is to have one deployment target, localhost, and the package will be tested locally with reboots disabled. However, I already have Visual Studio 2013 installed locally and would rather test in a pristine, controlled environment.

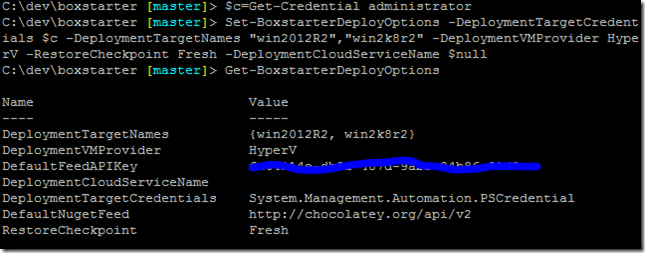
So I’ll adjust my Test Runner settings:

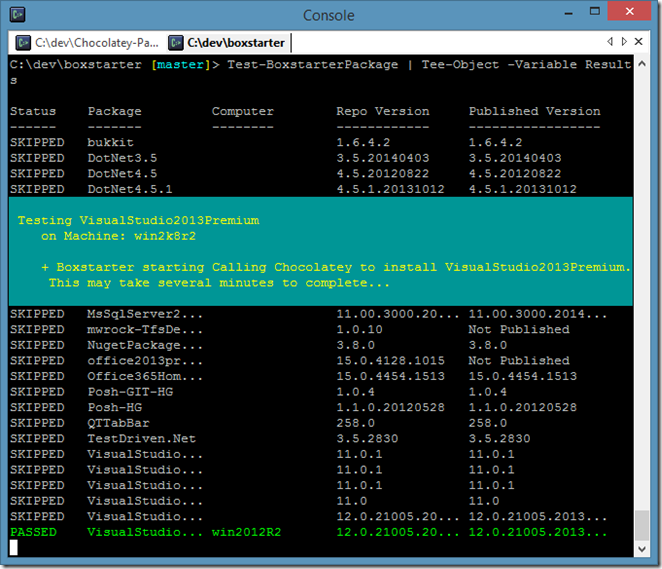
imageNow I’ll run the test interactively from my current shell. As the results run and complete, status is reported to my console:

image

Once the package tests have completed I see the results:

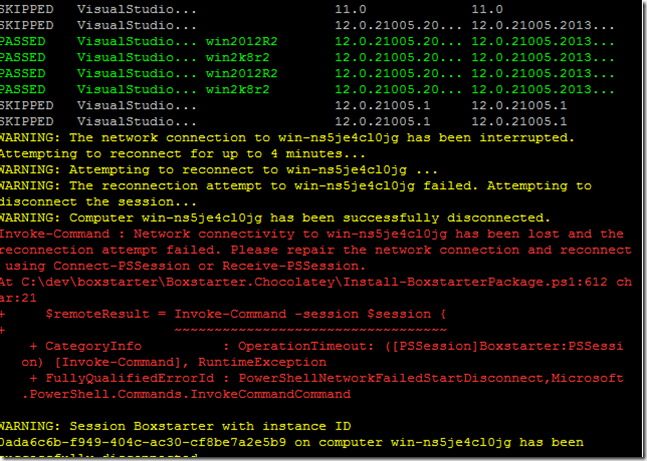
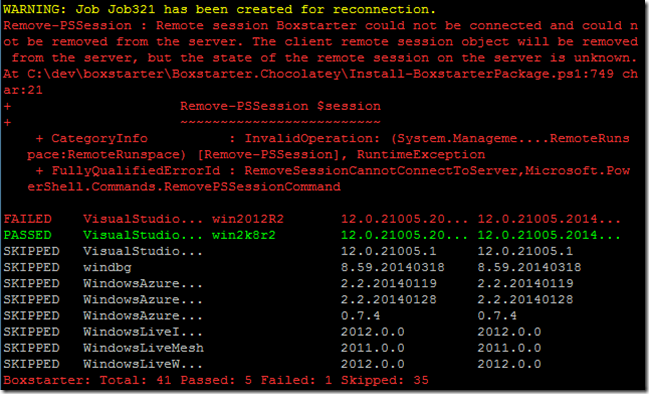
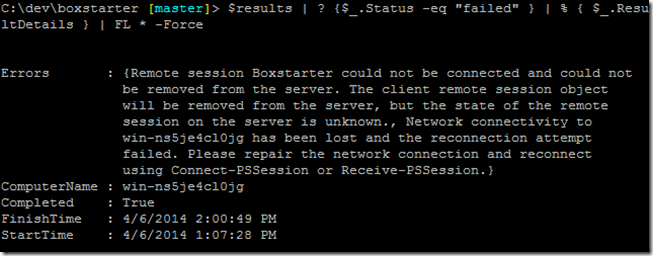
imageWhoa. What happened here? Well lets just say my daughter who makes a great Chaos Monkey decided to close the lid of my laptop (the VM host) cutting off network connectivity to the VMs. Fortunately, Boxstarter is able to recover upon opening the lid:

imageThe test that was interrupted likely succeeded in completing the installation. We can inspect the error details of the failure and do not see anything representing an error from the installer. If the installer returned a non 0 exit code, we would see it in the details.

imageI’m going to go ahead and publish the passed packages now. This publishes the two packages that passed on both test VMs.

imageAlso to be on the safe side, I’m going to go ahead and resubmit the failed package for testing. I just need to rerun the Test-BoxstarterPackage command. Since the other two packages were published, my remaining one package will be the only package with a version that is greater than its published version.

image

Other Changes in 2.4

There were several bug fixes in this release. Thanks to everyone who filed an issue! Also, these two enhancements were added:

  1. All calls to the Chocolatey installer (cinst) inside of a package now includes the local repository as a package source. This is handy when working with private feeds or debugging packages an you want the package to be installed from your local repository instead of the public Chocolatey feed.
  2. When invoking a package install targeting a remote machine, the current user does not need to ba an admin user on the deployment box. They do need to be admin on the deployment target. This was done to support deploying from a Visual Studio Online build server where the ientity controllin the build is not admin on the build server.

Please file issues if you observe any thing that does not seem right or if you would like to suggest new features. I’d love to know what you think would be a worthy addition to Boxstarter functionality.

Automate the Install and setup of a Team Foundation 2013 Server with Build services on a Azure VM with Boxstarter by Matt Wrock

tfsBoxLast week I released version 2.3 of Boxstarter which includes some Azure VM integration features to Boxstarter’s Chocolatey/Nuget Package management approach to Windows environment automation tools. I blogged about how one can use it to deploy and configure a publicly accessible Minecraft server. Well Minecraft might not be for everyone. Others might prefer a TFS 2013 server.

In this post we will install Boxstarter and the Windows Azure PowerShell tools, create a Windows Azure VM, and with a single command deploy a chocolatey package that will connect to our VM and install Sql Server 2012 Express with SP1, Team Foundation Server 2013 Express, configure the TFS server to connect to the database and create a default collection and also configure and start build services. You will then be able to launch a browser or Visual Studio and connect to your VM on port 8080 to access these services. Because the entire install and configuration is encapsulated in a Chocolatey package, you can repeat this on as many servers as you like again and again and again.

Azure is cool, but what about Hyper-V or “On Prem”

Definition: “On-Prem” is what the cool kids say when referring to On Premise installs or installations that runs on hardware which resides in your own data center.

In case you are not interested in deploying TFS on an Azure VM, I will also show you how you can apply the install package to an on prem server or a Hyper-V VM toward the later end of this post.

Chocolatey? Sounds yummy. What is it?

You are correct. It is yummy, but its not the kind of chocolate you are probably thinking of. Unless of course you are thinking of the chocolate that can install Visual Studio, Office 365, ITunes and over 1500 other applications in a single command. Next…next…finish? C’mon, what are you? a Farmer? Uhh…well if you are the guy who runs the entire TFS team (AKA Brian Harry), then maybe you are.

Chocolatey leverages Nuget packaging technology and standards to automate the installation of machine applications. While typical Nuget packages componentize code libraries that can easily be consumed by Visual Studio, Chocolatey packages make the command line installation of applications a simple and repeatable operation. Furthermore you can compose these packages to build out everything a server needs. The packages are entirely Powershell based so anything that you can do in Powershell (in other words, pretty much anything) can be captured in a package.

What does Boxstarter add?

Boxstarter provides an environment for running Chocolatey packages that can handle reboots, remote installations, windows specific settings and Windows Update control and several other features. Boxstarter takes Chocolatey and targets its use specifically for scenarios involving the setup of a Windows environment from scratch. You can check out this page on the Boxstarter.org site for details on Boxstarter specific features.

Preparing your deployment environment

Before you can begin actually deploying your Chocolatey package to build your TFS Server, we will install the Boxstarter core modules and its Boxstarter.Azure module and configure our Azure subscription account to be managed by the Windows Azure Powershell toolkit. This is a one time step that should only need to be performed once on an individual machine that uses Boxstarter.

PREREQUISITES: There are two key prerequisites to running the software and commands in this tutorial:

  • Powershell V 3 or higher. This ships with Windows 8/2012 and higher. Windows 7 and server 2008 R2 can be upgraded with the latest Windows Management Framework.
  • A Windows Azure subscription. Trying to add a VM without an Azure subscription will only end in disappointment. Don’t be disappointed. Get an Azure subscription instead! If you have an MSDN subscription, you can get one for FREEEEEE!!!

Getting Boxstarter

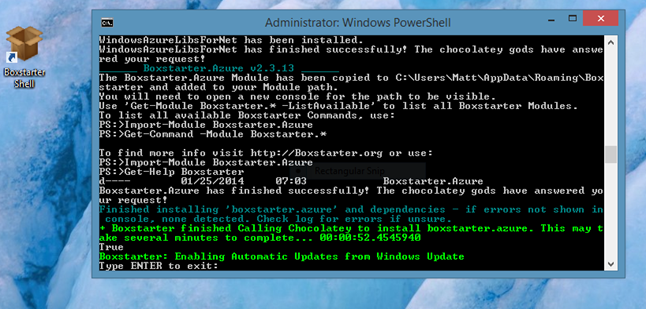
Getting Boxstarter is easy especially since you can get Boxstarter with Boxstarter. If you do not already have Chocolatey installed (if you do, just CINST Boxstarter.Azure), this is a no brainer. Simply direct IE, or any browser that supports click once apps, to http://boxstarter.org/package/nr/Boxstarter.Azure. This invokes a Click Once app that will bootstrap Chocolatey and install all Boxstarter modules including the new Boxstarter.Azure module. As I already mentioned, this is all built on top of Nuget packaging which supports package dependencies. So along with the Boxstarter.Azure package, the Windows Azure .Net libraries and Windows Azure Powershell tools will be downloaded and installed. If you do not have the .Net 4.5 framework, you get that too.

launchendNote that the /nr/ in the URL you used to kick off the Boxstarter install tells Boxstarter not to reboot your machine. Without that, if Boxstarter detects a pending reboot at any time during the install, it will reboot, and automatically log you back in and restart the install. Any install packages already installed will be skipped. Most Boxstarter packages and prerequisites should not require a reboot to run however the .Net framework version 4.5 may be an exception. So if you do not have that, you may want to remove the /nr/ from the above URL or you can manually rerun the install if you receive an error during the install.

The Boxstarter Shell

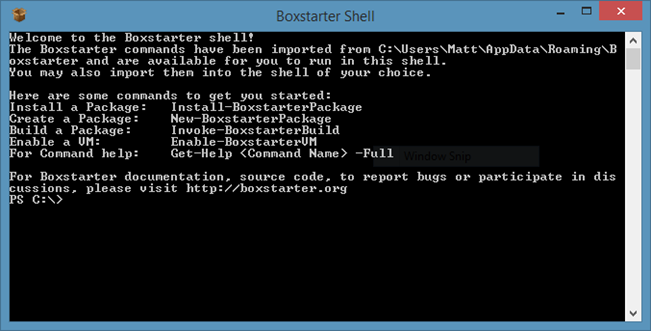
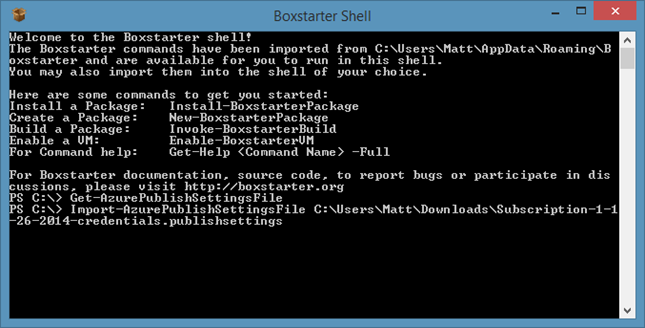
While you can use any PowerShell console to load the Boxstarter modules and run its commands (see this page for details on running Boxstarter commands), launching the Boxstarter Shell shortcut ensures that all modules are loaded and prints some “getting started” text when the shell first loads.

shell 

Due to the improved module auto loading in PowerShell version 3, this is not as much of an issue as it is in PowerShell 2 environments (which are not supported for the Azure integration features in Boxstarter). That said, if you are not familiar with PowerShell and want to use Boxstarter’s core commands in a PowerShell 2 environment, you may find using the Boxstarter Shell to provide a better experience.

Importing your Azure subscription details

Before you can create VMs or interact at all with your subscription resources via the Azure PowerShell commands, you need to import your Azure subscription and authentication certificate so that the Powershell commands can properly associate you with your account. The easiest way to establish this association is by running:

Get-AzurePublishSettingsFile

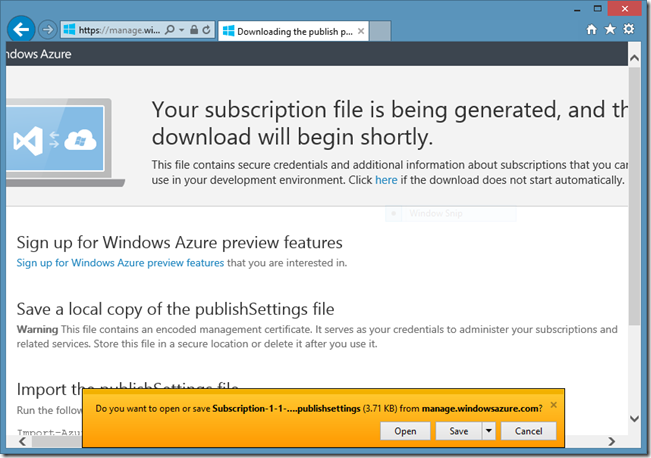
This will launch your default browser and assuming that you have not recently logged into the Azure management portal, you will find yourself at a Microsoft Account login screen. Once you successfully authenticate with your account, your publisher settings file will begin downloading.

publishChoose to Save these settings. Then after the download completes, click the “Open Folder” link and note the location where the recently downloaded publish settings file was saved. Then run Import-AzurePublishSettingsFile and pass the path of the file. My import command looks like this:

import


The final step to get all of your subscription settings properly configured is to set the Storage  Account to be used for all operations invoked with the Azure Powershell tools which Boxstarter uses to access your VM. If you already have a Azure VM you plan to use for your TFS server, Boxstarter can set this on its own, but we are going to assume that is not the case and create a new VM. So we will need to set this value. To find all of your current Storage accounts, if any, run:

PS C:\> Get-AzureStorageAccount

StorageAccountDescription : Implicitly created storage service
AffinityGroup             :
Location                  : West US
GeoReplicationEnabled     : True
GeoPrimaryLocation        : West US
GeoSecondaryLocation      : East US
Label                     : portalvhdslwf0p2qrfyt34
StorageAccountStatus      : Created
StatusOfPrimary           :
StatusOfSecondary         :
...

This is a snippet of the first of my storage accounts which is the one I will use. So I now run:

Set-AzureSubscription -SubscriptionName Subscription-1 `
  -CurrentStorageAccountName portalvhdslwf0p2qrfyt34

Subscription-1 is the name of my subscription. Creative I know. If you do not have a storage account, you can create one either using the Azure Powershell commands or using the Azure management portal. Using PowerShell, one can create a new account using:

New-AzureStorageAccount -StorageAccountName newaccount -Location "West US"

One detail not to be missed here is that the StorageAccountName must be only lowercase letters or numbers. The Location must be a valid Azure data center location. You can find all of them using the Get-AzureLocation command.

Understand that everything we have done up until now has been a one time setup process that we should not need to repeat on the same machine if you plan to use Boxstarter again.

Creating the Azure VM

You can create an Azure VM in a single command. We will use the New-AzureQuickVM command. Since this command expects an Admin user name and password and we will need these same credentials when provisioning the VM with Boxstarter, we will store the credentials once in a variable:

$secpasswd = ConvertTo-SecureString "1276Tfs!" -AsPlainText -Force
$cred=New-Object System.Management.Automation.PSCredential ("TfsAdmin", $secpasswd) 

Now lets create the VM:

New-AzureQuickVM -ServiceName MyTfsVMService -Windows -Name tfs1 `
  -ImageName 3a50f22b388a4ff7ab41029918570fa6__Windows-Server-2012-Essentials-20131217-enus `
  -Password $cred.GetNetworkCredential().Password -AdminUsername $cred.UserName `
  -InstanceSize Medium -Location "West US" –WaitForBoot

This will create a new VM named tfs1 and since I do not have an Azure Cloud Service named MyTfsVMService, it will also create a new Cloud Service in which the VM will run. You can run multiple VMs in a single cloud service. Note that the cloud service name must be unique not only to your account but to all azure. This is because the service name forms the DNS name by which the VMs are reached. All VMs created inside of MyTfsVMService will be accessed via MyTfsVMService.Cloudapp.net. Multiple VMs are accessed through a different port. Of course now that I have created the service, you may not reuse the name unless I delete it, which I will likely do very soon. If you have an existing cloud service that you would like to reuse, you may specify that service. If you do, make sure to omit the -Location argument since the VM will use the location assigned to the service. Finally, if you are supplying a brand new service, use the same Location as the one used by the Storage account you chose above.

A couple other things to point out here. For our TFS server, specify an instance size of AT LEAST Medium. While I tend to use smaller VMs for my personal use, with TFS and SQL Server together, you are likely to have a much better trial experience with the Medium size with 3.5GB of ram as opposed to 1.75 in the Small sized instances. Of course you pay more for the larger VMs. This is one reason we are using a Windows Server 2012 R2 image as opposed to an image prebuilt with Sql Server. Since the Sql Server image costs include the additional SQL licensing costs, they are considerably more expensive. We will be installing the Sql Express SKU which will be quite sufficient for out purposes (and free). Furthermore, the Server 2012 R2 images, according to the current Azure pricing information as of this post is provided at the lower Linux rates.

Since we specified the –WaitForBoot argument, the command will not complete until our VM has completed its build cycle and is ready for connections….Oh look!…Its ready!

image

Provisioning with Boxstarter

Now that we have our VM, the next logical thing to do is install our software. So what does that look like with Chocolatey packages run through Boxstarter?

Package Composition

There are several ways to approach package creation. There is a page devoted to this topic in the Boxstarter documentation. Boxstarter provides some convenient commands to make package creation easy and sometimes altogether unnecessary.  We will use a Github Gist to compose the package script. So the next logical question is “What is a package and what can/should we include in the script?”

As already stated, Chocolatey packages are based on and completely comply with the Nuget packaging specification. In the common Chocolatey scenario, the package consists of two files:

  • A Nuspec file which is an XML formated manifest with metadata describing the package. This includes key things like the package name, its version, what other packages it depends on and what files are included. There is more but this covers the basics.
  • The ChocolateyInstall file. This is a PowerShell (.ps1) file that actually performs the installation. The beauty of this file is that it can contain absolutely any valid Powershell which gives us a lot of flexibility and power. When this script is executed inside of Chocolatey, it has access to the many commands that Chocolatey exposes to cover lots of common install scenarios like downloading, unzipping, and silently installing MSI files. There are commands for creating shortcuts, installing windows features, and more. When running with Boxstarter, there are even more commands covering scenarios around initial environment setup such as installing critical Windows updates.

You can supply more files. For example there may be config files specific to the applications you are installing that you might want to include in the package. All files in the package are zipped up into a single .nupkg file. This is the file that the underlying Nuget infrastructure unpacks.

Lets take a look at what our ChocolateyInstall script looks like:

cinst VisualStudioTeamFoundationServerExpress2013
cinst MsSqlServer2012Express

$tfsConfig="$env:ProgramFiles\Microsoft Team Foundation Server 12.0\Tools\TfsConfig.exe"
.$tfsConfig unattend /configure /type:standard
.$tfsConfig unattend /configure /type:build `
  /inputs:collectionurl=http://localhost:8080/tfs`;ServiceAccountName="LOCAL SERVICE"`;ServiceAccountPassword="pass"

This uses the Chocolatey Install command CINST to first install two packages: TFS 2013 Express and SqlServer 2012 Express. Both of these packages have their own dependencies. Sql depends on the .Net framework version 3.5 and TFS depends on version 4.5. Since we are installing on to Windows Server 2012 R2, we already have .Net 4.5 but R2 does not come preinstalled with v. 3.5 so that will be installed as well.

Once these are installed we will configure TFS with a standard server configuration. This will use the local default named sql instance for the TFS configuration and collection databases and create both of them. That creates a server capable of hosting source control and work item tracking. Next we configure Build services so that now we can add Build controllers, agents and Build definitions to be executed.

Our goal is that when these commands complete, we can navigate to http://MyTfsVMService.CloudApp.net:8080/tfs from our local machine and see the web portal of our TFS collection.

Package Consumption

So how do we package up this script so that we can execute it and configure our VM? One answer is: we don’t need to. Boxstarter can take a file path or http URL and as long as they resolve to a raw text resource, Boxstarter will convert them to a temporary package and run them. This is very convenient for one off installs where you do not want to go through the trouble of composing a manifest and packaging process. Not that it is so onerous of a process. The down side to this approach is that if you plan to consume the same package again and again, a raw gist URL is very awkward to type and nearly impossible to memorize.

Lets say that we intend to use this package repeatedly and therefore want to invoke the package using a reasonably short and easy to remember label. Boxstarter provides a command that can create a minimal package from our gist.

New-PackageFromScript `
  -Source https://gist.github.com/mwrock/8576155/raw/3edd9c39bed40b2398e6158062a1e05f4b4c5dff/gistfile1.ps1 `
  -PackageName TfsServerWithBuild

This just created a TfsServerWithBuild.1.0.0.nupkg file in our “local package repository”. This is a special location on disk that Boxstarter looks for packages before attempting to fetch the package from a remote nuget feed. By default this is a folder in the same directory where the Boxstarter modules live, but you can configure Boxstarter to store them elsewhere. The local repo is great for personal use but cant likely be accessed let alone discovered by others. The best way to share your package with others is to publish the package to a feed.

Package Publishing

There are multiple options when it comes to publishing your package. If you think that the package provides value to a broad range of users and include those outside of your organization, the Chocolatey.org feed is likely the best place. If fact this is where the TFS and SqlServer packages reside that our package will install. If the package likely only has value for yourself or your own organization, then a feed provider like MyGet.org works great. You can create one or more of your own feeds on Myget. These can even be private and require authentication which is desirable especially when there is sensitive information contained inside of your package.

I’m going to publish this package to a Boxstarter Community feed on Myget.org.  By default, Boxstarter will include this feed in the feeds it scans to find packages. Here is how we publish:

PS C:\> ."$env:ChocolateyInstall\ChocolateyInstall\nuget" push C:\Users\Matt\App
Data\Roaming\Boxstarter\BuildPackages\TfsServerWithBuild.1.0.0.nupkg <My Own KEY> -Source https://www.myget.org/F/boxstarter/api/v2/pack
age
Pushing TfsServerWithBuild 1.0.0 to 'https://www.myget.org/F/boxstarter/api/v2/p
ackage'...
Your package was pushed.
PS C:\>

Note that as with any Nuget based package feed, you always push using an API key that identifies you as the publisher. You can sign up for a free personal account at Myget and do not have to pay for creating and publishing to feeds. Here we see our feed show up:image

Installing the Package

Finally we are ready to kick off our install. Here it goes:

PS C:\> Enable-BoxstarterVM -Provider azure -CloudServiceName MyTfsVMService -VM
Name tfs1 -Credential $cred -CheckpointName BareOS | Install-BoxstarterPackage -
PackageName TfsServerWithBuild
Boxstarter: Locating Azure VM tfs1...
Boxstarter: Installing WinRM Certificate
Boxstarter: Configuring local Powershell Remoting settings...

Powershell remoting is not enabled locally. Should Boxstarter enable powershell
 remoting?
Powershell remoting is not enabled locally. Should Boxstarter enable powershell
 remoting?
[Y] Yes  [N] No  [?] Help (default is "Y"):
Boxstarter: Enabling Powershell Remoting on local machine
Boxstarter: Testing remoting access on mytfsvmservice.cloudapp.net...
Boxstarter: Creating Checkpoint BareOS for service MyTfsVMService VM tfs1 at


Here we see the beginning of the Boxstarter output. We are issuing two commands really – piping one to the other. The Enable-BoxstarterVM performs a VM specific implementation for finding the DNS name and WinRM port for connecting to the VM. It may also do some prep work to ensure that a connection can be made. In Azure’s case, this includes downloading the certificate from the VM and installing it into our root certificate store so that we can communicate with the VM using HTTPS, which is the protocol powershell remoting is using here.

VM Checkpoints

Also note that just before the install begins, a checkpoint is taken that we label “BareOS.” This is optional but convenient in the event something goes wrong with our package as a result of a mistake in our authoring. We can then Restore this checkpoint, fix the package and retry from the exact same state we had when we began without needing to wipe out and create a new VM. You will not find these Checkpoints in the Azure management portal. Boxstarter uses Azure Blob Snapshots to create an implementation of checkpoints similar to what you would find in Hyper-V or other VM technologies.

If the BareOS checkpoint already existed when we ran our command, instead of creating the checkpoint, Boxstarter would have restored it. So if we were to run the above command without any changes all over again, our VM would be restored to its original state first.

Boxstarter exposes some additional commands for listing, creating, restoring and deleting checkpoints. You can check out the Boxstarter Azure documentation for details.

ProTip #1: Substitute “HyperV“ for the “Azure” provider argument and remove the CloudServiceName argument and Boxstarter would look for a Hyper-V VM named tfs1 and provision it. With Hyper-V, Boxstarter may mount the VM’s VHD file to configure it for remote connectivity. That’s often not necessary.

You don’t think you could run this in a Hyper-V VM because you would need another Windows Server licence? Not true. You can get evaluation VHDs for free and they can legally be “reevaluated.” See my blog on the Boxstarter Hyper-V functionality that touches on this point and where you can find them.

Adding an Endpoint for port 8080

By default, TFS listens on port 8080 for requests to its web services. We need to provide an endpoint to our Azure Service that will forward all 8080 traffic to the same port on our VM. By default, when you create a new VM in Azure, it will automatically create endpoints for Remote Desktop and PowerShell remoting. Adding an endpoint is fairly straight forward. Here is the command we will use:

$vm = Get-AzureVM -ServiceName MyTfsVMService -Name tfs1
Add-AzureEndpoint -Name tfs -Protocol tcp -LocalPort 8080 -PublicPort 8080 -VM $vm | 
  Update-AzureVM

Lets check out or new TFS server

First lets take a look at the last bit of Boxstarter output:

Errors       : {}
ComputerName : mytfsvmservice.cloudapp.net
Completed    : True
FinishTime   : 1/26/2014 12:18:04 AM
StartTime    : 1/25/2014 11:47:21 PM

This is exactly what we want to see. Our installation completed with no errors. This means no exceptions were thrown and the final Exit Code was 0.

So lets see if we can create a new project in Visual Studio.

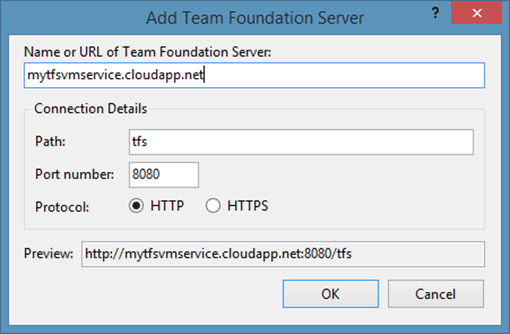
First we need to connect to our server:

image

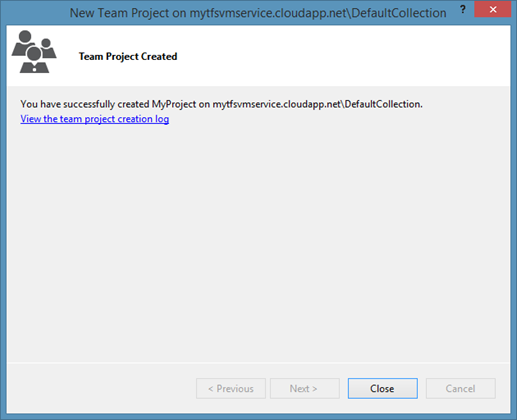
You will be prompted for a user name and password. Provide the same credentials that you provided earlier when creating the VM admin account. Now lets create a new project:

image

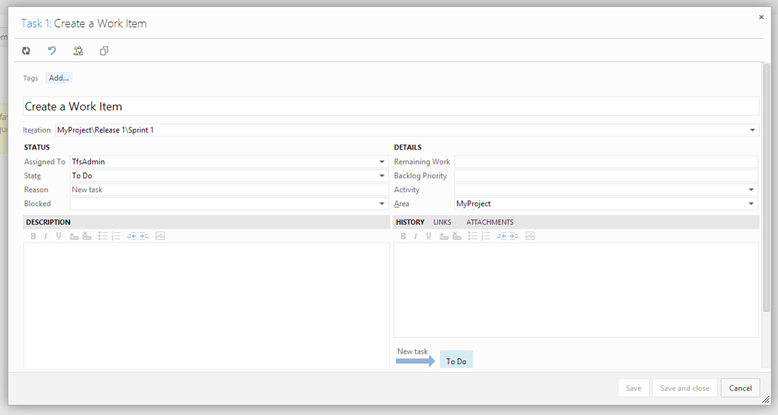
Looks good so far. Now lets go to the web portal and create a work item.

image

Now THAT is a work item.

On Premise Install (aka physical machine install)

Boxstarter can install anywhere. We just saw Boxstarter work on an Azure VM and I mentioned how to accomplish the same with Hyper-V.  As long as Powershell Remoting or at least remote WMI is enabled on a machine, the Boxstarer user has admin rights and its available on the network, Boxstarter can be used to provision any physical or virtual machine using Install-BoxstarterPackage:

Install-BoxstarterPackage -ComputerName MyMachine.MyDomain.com -Credential $creds -PackageName MyPackage


If you are actually on the local machine, just as we did at the beginning of this post to install the Boxstarter modules, you can use the click-once launcher from IE or any Click-Once enabled browser (extensions exist for both Chrome and Firefox). If your default browser can run click-once apps, you can even launch the installer from a command line:

START http://boxstarter.org/package/MyPackage

Released Boxstarter 2.3: Windows Azure integration by Matt Wrock

Just a month after releasing integration with Hyper-V, I am pleased to announce support for auto connection configuration and first class Checkpointing in Windows Azure VMs. Boxstarter can now make cloud provisioning of your boxes a straight forward process.

What does this do?

For readers unfamiliar with Boxstarter or Chocolatey, this makes the provisioning of Azure VM’s with all of the tools, applications, settings, patches, etc that you require a simple and repeatable event. If you spend much time building out VMs, tearing them down and then rebuilding them again and again, please stop immediately. Create a Chocolatey package to define your server’s end state and let Boxstarter push it out.

What I have just described can be accomplished on a local physical box, a remote physical box or a VM. Below I will describe the features in this release that apply specifically to the newly released Azure Integration.

Auto Connection Configuration

Boxstarter uses Powershell remoting to initiate provisioning. By default, Azure enables Powershell remoting on all of its Windows server VMs. However, there are a few not so obvious steps involved to make a connection to the VM. Boxstarter will locate the DNS name of the VM and the WinRM port listening for remoting connections. Boxstarter will also download the SSL certificate on the machine and install it locally. This allows Boxstarter to make a secure connection with the VM and invoke the provisioning of your server.

Checkpoints

If you are familiar with almost any popular VM technology, you are certainly familiar with checkpointing (also known as Snapshots). This is the ability to save the state of the VM at a particular point in time and later restore to that point. Unfortunately Azure VMs do not easily expose this same functionality. You can create SysPrepped images in the portal, attach and detach disks, but there is no clear and simple way to take and restore a checkpoint let alone several checkpoints.

Boxstarter makes this possible by leveraging Azure Blob Snapshots under the hood and exposing this via four commands:

  • Set-AzureVMCheckpoint
  • Get-AzureVMCheckpoint
  • Restore-AzureVMCheckpoint
  • Remove-AzureVMCheckpoint

Each of these take a VM and CheckpointName parameter. Just like the Hyper-V integration, Boxstarter can create and restore checkpoints as part of the provisioning process since you may want to take or restore a checkpoint just before provisioning begins. For more information regarding their usage, please view their commandline help or visit Boxstarter.orgs Azure documentation page.

Case Study: Provision a public Minecraft server

You and your friends have decided to play homage to your local NFL team’s upcoming Superbowl challenge by constructing a replica of the team’s arena within a Minecraft landscape. You need a server that everyone can connect to and contribute as time permits. It’s a common cloud deployment scenario. We’ve all been there.

Step One: Get the Boxstarter.Azure module

The Boxstarter.Azure module does not install along with the core Boxstarter bits. To download and install it along with all of its dependencies, run:

CINST Boxstarter.Azure

Note: You will need to be running at least Powershell version 3. You can run:

$Host.Version

at any powershell console to determine your version and if you are running a previous version, you can install Powershell version 3 or 4 via Chocolatey.

Now, for best results, open the Boxstarter Shell to run the rest of this sample.

Step Two: Configure your Azure subscription

There is a one time configuration step required so that the Azure Powershell commands know which account to manage and also know that you are authorized to manage it. This step includes running three commands:

Get-AzurePublishSettingsFile

This command will launch your default browser and initiate a Publisher Settings download. First you will land on the Windows Azure sign in page and as soon as you successfully authenticate, the download will begin.

Now simply import the file that was just downloaded:

Import-AzurePublishSettingsFile -PublishSettingsFile C:\Users\Matt\Downloads\Subscription-1-1-19-2014-credentials.publishsettings


Finally, specify the name of the storage account you want to use. You can run Get-AzureStorageAccount for a list of all of your storage accounts.

Set-AzureSubscription -SubscriptionName MySubscription -CurrentStorageAccountName MyStorageAccount

Note: Boxstarter will attempt to set your Current Storage Account for you if it has not been specified. However, you will need to run the command yourself if you need to run other Windows Azure Powershell commands prior to using Boxstarter.

Thats it. You can now use the Windows Azure Powershell and Boxstarter commands to provision VMs in Azure.

Step Three: Create the Azure VM

$cred=Get-Credential AzureAdmin
New-AzureQuickVM –ServiceName BoxstarterTest1 -Windows -Name MyVM `
  -ImageName 3a50f22b388a4ff7ab41029918570fa6__Windows-Server-2012-Essentials-20131217-enus `
  -Password $cred.GetNetworkCredential().Password -AdminUsername $cred.UserName `
  -Location "West US" –WaitForBoot

This uses the Azure Powershell module to create a new Cloud Service and a new small VM with Server 2012 R2 in Azure’s West US data center which just so happens to reside relatively near your football team. How convenient. Ehh…maybe not. But it is a pretty neat coincidence. Note that if you are reusing an existing Cloud service in the command above, you want to omit the –Location argument since the location of the existing service will be used.

Step Four: Create your Chocolatey package

Getting a Minecraft server up and running is really pretty simple. Here is the script we will use:

CINST Bukkit
Install-WindowsUpdate –AcceptEula
New-NetFirewallRule -DisplayName "Minecraft" -Direction Inbound -LocalPort 25565 -Protocol TCP
-Action Allow
Invoke-WmiMethod Win32_Process Create -Args "$env:systemdrive\tools\bukkit\Bukkit.bat"

This installs Bukkit, a popular Minecraft server management software which will also install the Java runtime. It will install all critical Windows updates. Then we allow inbound traffic to port 25565, the default port used by Minecraft servers. We will save this in a Gist and use the RAW gist url as our package source. The Url for the gist is:

https://gist.github.com/mwrock/8518683/raw/43ab568ff32629b278cfa8ab3e7fb4c417c9b188/gistfile1.txt

Step Five: Use Boxstarter to provision the server

$cred=Get-Credential AzureAdmin
Enable-BoxstarterVM -provider Azure -CloudServiceName BoxstarterTest1 `
  -VMName MyVM -Credential $cred –CheckpointName Fresh | 
    Install-BoxstarterPackage `
     -PackageName https://gist.github.com/mwrock/8518683/raw/43ab568ff32629b278cfa8ab3e7fb4c417c9b188/gistfile1.txt

This creates a connection to the VM and runs the installation script on that server. This may take a little time and is likely to include at least one reboot.

Step Six: Create a new Azure endpoint for the Minecraft port

$vm = Get-AzureVM -ServiceName BoxstarterTest1 -Name MyVM
Add-AzureEndpoint -Name Minecraft -Protocol tcp -LocalPort 25565 -PublicPort 25565 -VM $vm | 
  Update-AzureVM

This is necessary so that traffic can be properly routed to our server.

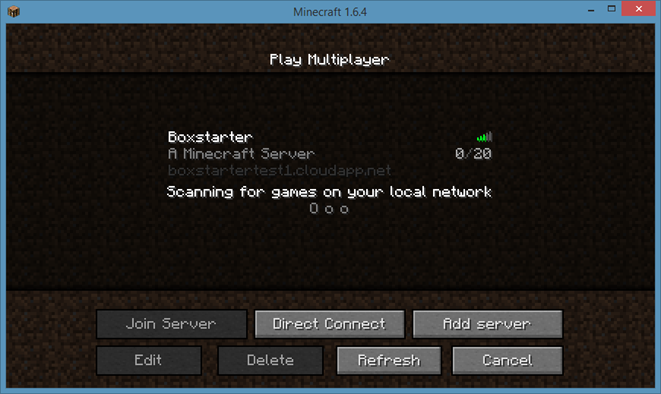
Thats it, fire up Minecraft and connect to our server.

image

Other new features worth mentioning

Enable-MicrosoftUpdate and Disable-MicrosoftUpdate

The credit to these new functions goes to Gary Ewan Park (@gep13) who contributed both. Thanks Gary!! This adds the ability for windows to update many Microsoft products beyond just windows. It essentially toggles this:

image


The Boxstarter Shell

Especially if you are not comfortable with Windows PowerShell, you may prefer to use the Boxstarter Shell to run Boxstarter commands. The Boxstarter Shell will make sure that the user is running with administrative privileges, the execution policy is compatible and all Boxstarter PowerShell modules are loaded and accessible. This shell also prints some basic "Getting Started" text at startup to assist you in running your first commands.

Easily test Chocolatey package development with Boxstarter 2.2 Hyper-V integration by Matt Wrock

Hyper-VA couple weeks ago I released Boxstarter v2.2. The primary feature added is the ability to target Hyper-V VMs. Boxstarter can automatically configure them without any manual setup and can both save and restore checkpoints. You can learn about the details here. I’d like to give a big thanks to Gary Park (@gep13) for providing early feedback and helping me catch some holes I needed to fill in to make this release a better user experience. I’m sure I have not identified the last of them so please, create an issue or discussion on the Codeplex site if you run into issues.

This post will discuss how you can use this new feature to greatly reduce the friction involved in Chocolatey package development or in the creation of Boxstarter-style chocolatey packages to develop Windows environments leveraging Hyper-V VMs. No additional Windows licenses will be required. More on that later.

NOTE: Both the Boxstarter.HyperV PowerShell module and Microsoft’s Hyper-V module require PowerShell version 3 or higher on the VM host. This is automatically available on Windows 8 and server 2012. On Windows 2008 R2, it can be installed via the Windows Management Framework.

Integration testing for Chocolatey packages

When you are authoring a Chocolatey package, you are likely creating something that changes the state of the machine upon which the package is installed. It may simply install a single piece of software or it may install several pieces of software along with various dependencies and possibly configure services, firewall port rules, IIS sites, databases, etc. As the package author you want to make sure that the package can run and perform the installation reliably and repeatably and perhaps on a variety of OS versions. This is almost impossible to test directly on your dev environment.

You want one or more virtual environments that can be started in a clean state that mimics what you imagine most others will have when they download and install your package. Furthermore, as you work out the kinks of your package, you want to be able to start over again and again and again. Virtual machines make this workflow possible.

Hyper-V VM technology, there is a good chance you already have it

There are lots of great VM solutions out there. Besides the cloud solutions provided by Amazon, Microsoft Azure, Rackspace and others, VMWare, Hyper-V and Virtual Box are some very popular non cloud options. Hyper-V is Microsoft’s solution. If you have Windows 8 Pro or greater or Windows 2012 or 2008 R2, this technology is available to you for free. I run Windows 8.1 Pro on a Lenovo X1 laptop with 8GB and can usually have 3 VMs running simultaneously. It works very well.

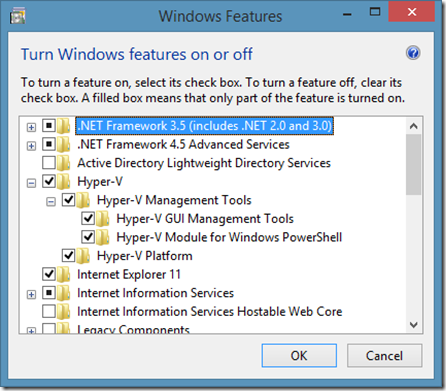
Simply enable the Hyper-V features on your machine either using the “Turn Windows features on or off” GUI

image

or from a command line running:

dism.exe /Online /Enable-Feature:Microsoft-Hyper-V /All
dism.exe /Online /Enable-Feature:Microsoft-Hyper-V-Management-PowerShell

Creating the VM

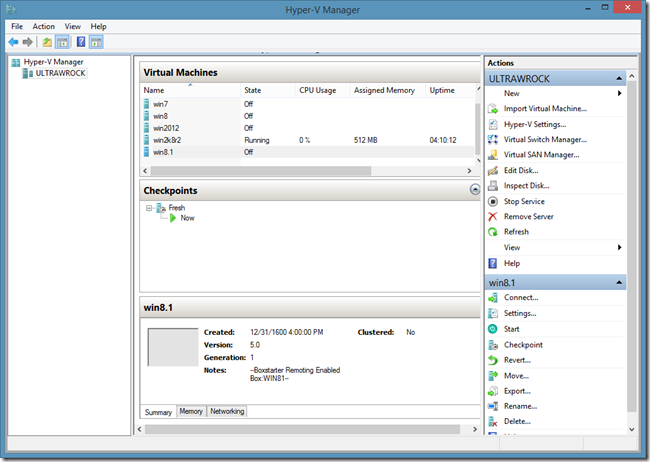
The first thing you need to do is create one or more VMs to reproduce the environment you are targeting. Developing Boxstarter, I have 5 VMs:

image

I have one for every Windows version I care to test on. I save the VM with a base os install with no configuration tweaks other than maybe changing the computer name and adding a admin user. I want to have Windows with the default settings. The first thing you need to get started creating a VM, is a VHD. That is the file type that Hyper-V uses to store the machine. That’s really all a VM is. It’s a file. It can get much more complicated with different VHD formats, differencing disks, Fixed disks, Dynamically growing disks, etc. I’m not going to get into that here and it is not necessary to understand for what I’m going to show you. However if you find yourself working with VMs a lot and want to learn how to maintain them efficiently, you will want to look into those details.

There are two main ways that I typically create a clean Windows VHD:

Create a new VHD and mount a Windows Install ISO as a DVD drive

If you have a Windows installation ISO file, you can mount this to the VM as a virtual DVD drive. Remember those? You need to create an empty VHD file which represents a system with no OS installed. The VM will boot from the virtual DVD and walk you through the Windows Install wizard. This can all be done through the Hyper-V GUI or from PowerShell:

New-VM -Name "myVM" -MemoryStartupBytes 1GB -NewVHDPath "D:\VHDs\w81.vhdx" -NewVHDSizeBytes 60GB
Set-VMDvdDrive -VMName myVM -Path "C:\ISOs\EVAL_EN-US-IRM_CENA_X64FREE_EN-US_DV5.iso"
Start-VM "myVM"

Once I complete the Windows installation and rename the computer, I create a checkpoint so that I can always snap to the point in time when windows had absolutely no additional configuration beyond installation and computer rename.

Checkpoint-VM -Name "myVM" -SnapshotName "BareOS"

Create a new VM from an existing base OS VHD

After performing the above procedure from an ISO, I like to “freeze” the VHD of the newly installed OS. To do this, I create a differencing disk of that VHD and mark the original VHD as read only. Now I can create new VMs based on the differencing disk that contains only the difference of the fresh install and all subsequent work. Here, I’ll create a differencing VHD based on the VHD we created for our new VM above and then we will attach it to the new VM:

Stop-VM myVM
New-VHD -Path "D:\VHDs\w81diff.vhdx" -ParentPath "D:\VHDs\w81.vhdx" -Differencing
Set-VMHardDiskDrive -VMName myvm -Path "D:\VHDs\w81diff.vhdx"
Start-VM myVM


Downloading evaluation versions of Windows installers

You don't need a purchased copy of Windows or a fancy shmancy MSDN subscription to get a Windows OS for testing purposes. As of this posting, anyone can download evaluation copies of Windows 8.1, Server 2008 R2 and 2012 R2. The evaluation period is between 90 and 180 days depending on the version you download. In addition to the ISO, the server OS versions also provide an option to download VHD’s. These allow you to skip the OS installer. They come with a builtin Administrator account with a password set to Pass@word1. Convenient since that is the same password I use for all of my personal online accounts. When the evaluation expires, it is perfectly legal to simply start over from the original installer or VHD. Here are the current URLs you can use to download these evaluations:

Connecting the VM to the internet

While it is certainly possible and sometimes desirable to write Chocolatey packages that work fine offline, chances are that you want your VM to be able to access the world wide web. There are several ways to do this. For most “normal” dev environments, the following approach should work.

Get a listing of your Network Adapters:

C:\> Get-NetAdapter

Name                      InterfaceDescrip                        ifIndex Status                                                                          s
----                      --------------------                    ------- -----
Bluetooth Network Conn... Bluetooth Device (Personal Area Netw...       5 Di...
Wi-Fi                     Intel(R) Centrino(R) Advanced-N 6205          3 Up


Next add a “Virtual Switch” that binds to your actual network adapter. This only has to be done once on the VM host. The switch can be reused on all guests created on the host. After adding the switch, it can be applied to the VM:

New-VMSwitch -NetAdapterInterfaceName "Wi-Fi" -Name MySwitch
Set-VMSwitch -Name "myVM" -VMSwitch "MySwitch"

In my case, since I am using a wireless adapter, Hyper-V creates a network bridge and a new Hyper-V adapter that binds to the bridge and that any VM using this switch will use.

Getting Boxstarter

There are lots of ways to get the Boxstarter modules installed. If you have Chocolatey, just CINST Boxstarter. Otherwise, you can download the installer from either the codeplex site or Boxstarter.org and run the setup.bat in the zip file and then open a new PowerShell window. Since the Boxstarter.HyperV module requires at least PowerShell 3 which can auto load all modules in your PSModulePath and the Boxstarter installer adds the Boxstarter modules to that path, all Boxstarter commands should be available without needing to import any modules explicitly.

Tell Boxstarter where your packages are and build them

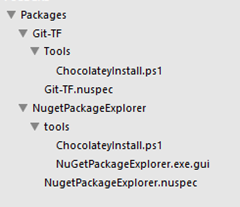
Perhaps the packages you want to test have not yet been pushed to a nuget feed and you want to test the local development version. Boxstarter provides several commands to make creating packages simple. See the boxstarter docs for details. We’ll assume that we have pulled our package repository from source control to a local Packages directory. It has two packages:

image

Now we will tell Boxstarter where our local packages are stored by changing Boxstarter’s localRepo setting from the default BuildPackages folder in Boxstarter’s module directory to our package directory.

C:\dev\Packages> Set-BoxstarterConfig –LocalRepo .
C:\dev\Packages> $Boxstarter

Name                           Value
----                           -----
IsRebooting                    False
NugetSources                   http://chocolatey.org/api/v2;http://www.myget...
BaseDir                        C:\Users\Matt\AppData\Roaming\Boxstarter
LocalRepo                      C:\dev\packages
RebootOk                       True
Log                            C:\Users\Matt\AppData\Local\Boxstarter\boxsta...
SuppressLogging                False


Checking the $Boxstarter variable that holds our boxstarter settings confirms that Boxstarter is tracking our local repository where we are currently working.

Now Boxstarter can build our packages by using the Invoke-BoxstarterBuild command:

C:\dev\Packages> Invoke-BoxStarterBuild -all
Boxstarter: Scanning C:\dev\packages for package folders
Boxstarter: Found directory Git-TF. Looking for Git-TF.nuspec
Calling 'C:\Chocolatey\chocolateyinstall\nuget.exe pack .\Git-TF\Git-TF.nuspec -NoPackageAnalysis'.
Attempting to build package from 'Git-TF.nuspec'.
Successfully created package 'C:\dev\packages\Git-TF.2.0.2.20130214.nupkg'.

Your package has been built. Using Boxstarter.bat Git-TF or Install-BoxstarterPackage Git-TF will run this package.
Boxstarter: Found directory NugetPackageExplorer. Looking for NugetPackageExplorer.nuspec
Calling 'C:\Chocolatey\chocolateyinstall\nuget.exe pack .\NugetPackageExplorer\NugetPackageExplorer.nuspec -NoPackageAnalysis'.
Attempting to build package from 'NugetPackageExplorer.nuspec'.
Successfully created package 'C:\dev\packages\NugetPackageExplorer.3.7.0.20131203.nupkg'.

Your package has been built. Using Boxstarter.bat NugetPackageExplorer or Install-BoxstarterPackage NugetPackageExplorer will run this package.

This iterates all folders in our local repo and creates the .nupkg files for all our package nuspec files. Note that if we do not want to build every package we could specify a single package to build:

C:\dev\Packages> Invoke-BoxStarterBuild -Name Git-TF

Testing the packages in your VMs

Now we are ready to test our packages. Unless the package is incredibly trivial, I like to test on at least a PowerShell 2 and a Powershell 3 (or 4) environment since there are some unobvious incompatibilities between v2 and post v2 versions. We will test against Server 2012 and Server 2008 R2. We can pipe our VM names to Boxstarter’s Enable-BoxstarterVM command which will inspect the VM and ensure that Boxstarter can connect to the VM using PowerShell remoting. If it can not, Boxstarter will manipulate the VM machine’s registry settings in its VHD to enable WMI Firewall rules which will allow Boxstarter to connect and enable PowerShell remoting. We will also ask Boxstarter to restore a checkpoint (named “fresh”) that we previously set which brings the VM to a clean state.

After ensuring that it can establish connections to the VMs, Boxstarter copies the Boxstarter modules and the local repository nupkg files to the VM. Then Boxstarter initiates the installation of the package on the VM.

So lets have Boxstarter test a package out on our VMs and analyze the console output.

C:\dev\Packages> "win2012","win2k8r2" | Enable-BoxstarterVM
-Credential $c -CheckpointName fresh | Install-BoxstarterPackage -PackageName NugetPackageExplorer -Force
Boxstarter: fresh restored on win2012 waiting to complete...
Boxstarter: Configuring local Powershell Remoting settings...
Boxstarter: Testing remoting access on win2012...
Boxstarter: Testing WSMAN...
Boxstarter: fresh restored on win2k8r2 waiting to complete...
Boxstarter: Configuring local Powershell Remoting settings...
Boxstarter: Testing remoting access on WIN-HNB91NNAB2G...
Boxstarter: Testing WSMAN...
Boxstarter: Testing WMI...

Here I pipe the names of my VMs to Boxstarter’s Enable-BoxstarterVM command. I have a checkpoint named “fresh” which is my “clean” state so Boxstarter will restore that checkpoint before proceeding. The result of Enable-BoxstarterVM, which is the computer name and credentials of my VMs, is piped to Install-BoxstarterPackage which will perform the package installation.

We can see that Boxstarter checks WSMan, the protocol used by PowerShell remoting, and if that is not enabled it also checks WMI. Windows 2012 has PowerShell remoting enabled by default so there is no need to check WMI, but Server 2008 R2, does not have PowerShell remoting enabled and thus checks for WMI. I am using the built-in administrator account and WMI is accessible. Therefore Boxstarter does not need to make any adjustments to the VM’s registry. If WMI was not accesible or if I was using a local user, Boxstarter would need to edit the registry and enable the WMI ports and also enable LocalAccountTokenFilterPolicy for the local user.

Also note that the 2008 R2 VM has a different computer name than the VM Name, WIN-HNB91NNAB2G. Boxstarter will find the DNS name of the VM and pass that on to the Install-BoxstarterPackage command which needs that to establish the remote connection.

Boxstarter Version 2.2.56
(c) 2013 Matt Wrock. http://boxstarter.org

Boxstarter: Configuring local Powershell Remoting settings...
Boxstarter: Configuring CredSSP settings...
Boxstarter: Testing remoting access on win2012...
Boxstarter: Remoting is accesible on win2012
Boxstarter: Copying Boxstarter Modules and local repo packages at C:\dev\Packages to C:\Users\Matt\AppData\Local\Temp on win2012...
Boxstarter: Creating a scheduled task to enable CredSSP Authentication on win2012...

Here Boxstarter begins the install on win2012. It determines that remoting to the VM is accessible, copies the Boxstarter modules and the local packages and enables CredSSP (using CredSSP allows Boxstarter packages to access other remote resources that may need the user’s credentials like network shares).

[WIN2012]Boxstarter: Installing package 'NugetPackageExplorer'
[WIN2012]Boxstarter: Disabling Automatic Updates from Windows Update
[WIN2012]Boxstarter: Chocolatey not instaled. Downloading and installing...
[WIN2012]+ Boxstarter starting Calling Chocolatey to install NugetPackageExplorer. This may take several minutes to complete...
Chocolatey (v0.9.8.23) is installing 'NugetPackageExplorer' and dependencies. By installing you accept the license for 'NugetPackageExplorer' and each dependency you are installing.
______ DotNet4.5 v4.5.20120822 ______
Microsoft .Net 4.5 Framework is already installed on your machine.
______ NugetPackageExplorer v3.7.0.20131203 ______
Downloading NugetPackageExplorer 64 bit (https://github.com/mwrock/Chocolatey-Packages/raw/master/NugetPackageExplorer/NpeLocalExecutable.zip) to C:\Users\ADMINI~1\AppData\Local\Temp\chocolatey\NugetPackageExplorer\NugetPackageExplorerInstall.zip
Extracting C:\Users\ADMINI~1\AppData\Local\Temp\chocolatey\NugetPackageExplorer\NugetPackageExplorerInstall.zip to C:\Chocolatey\lib\NugetPackageExplorer.3.7.0.20131203...
NugetPackageExplorer has finished successfully! The chocolatey gods have answered your request!
'C:\Chocolatey\lib\NugetPackageExplorer.3.7.0.20131203\NugetPackageExplorer.exe' has been linked as a shortcut on your desktop
File association not found for extension .nupkg
    + CategoryInfo          : NotSpecified: (File associatio...xtension .nupkg
   :String) [], RemoteException
    + FullyQualifiedErrorId : NativeCommandError
    + PSComputerName        : win2012

Elevating Permissions and running C:\Windows\System32\WindowsPowerShell\v1.0\powershell.exe -NoProfile -ExecutionPolicy unrestricted -Command "& import-module -name  'C:\Chocolatey\chocolateyinstall\helpers\chocolateyInstaller.psm1'; try{cmd /c assoc .nupkg=Nuget.Package; start-sleep 6;}catch{write-error 'That was not
sucessful';start-sleep 8;throw;}". This may take awhile, depending on the statements.
Elevating Permissions and running C:\Windows\System32\WindowsPowerShell\v1.0\powershell.exe -NoProfile -ExecutionPolicy unrestricted -Command "& import-module -name  'C:\Chocolatey\chocolateyinstall\helpers\chocolateyInstaller.psm1'; try{cmd /c ftype Nuget.Package="C:\Chocolatey\lib\NugetPackageExplorer.3.7.0.20131203\NugetPackageExplorer.exe" %1; start-sleep 6;}catch{write-error 'That was not sucessful';start-sleep 8;throw;}". This may take awhile, depending on the statements.
NuGet Package Explorer has finished successfully! The chocolatey gods have answered your request!
Adding C:\Chocolatey\bin\NuGetPackageExplorer.bat and pointing to '%DIR%..\lib\nugetpackageexplorer.3.7.0.20131203\nugetpackageexplorer.exe'.
Adding C:\Chocolatey\bin\NuGetPackageExplorer and pointing to '%DIR%..\lib\nugetpackageexplorer.3.7.0.20131203\nugetpackageexplorer.exe'.
Setting up NuGetPackageExplorer as a non-command line application.
Finished installing 'NugetPackageExplorer' and dependencies - if errors not shown in console, none detected. Check log for errors if unsure.
[WIN2012]+ Boxstarter finished Calling Chocolatey to install NugetPackageExplorer. This may take several minutes to complete... 00:00:31.8857706
[WIN2012]Boxstarter: Enabling Automatic Updates from Windows Update

Errors       : {File association not found for extension .nupkg}
ComputerName : win2012
Completed    : True
FinishTime   : 12/28/2013 1:05:13 AM
StartTime    : 12/28/2013 1:04:00 AM

Now we see mostly what we would expect to see if we were doing a vanilla CINST via Chocolatey. What is noteworthy here is that Boxstarter outputs an object to the pipeline for each VM. This object holds basic metadata regarding the installation including any errors encountered. In our case, the installation did produce one non-terminating error. Overall the install is successful.

Now Boxstarter moves on to the Server 2008 R2 VM.

Boxstarter: Testing remoting access on WIN-HNB91NNAB2G...
Boxstarter: Enabling Powershell Remoting on WIN-HNB91NNAB2G
Boxstarter: PowerShell Remoting enabled successfully
Boxstarter: Copying Boxstarter Modules and local repo packages at C:\dev\Packages to C:\Users\Matt\AppData\Local\Temp on WIN-HNB91NNAB2G...
Boxstarter: Creating a scheduled task to enable CredSSP Authentication on WIN-HNB91NNAB2G...

This is slightly different from the Server 2012 install. PowerShell remoting was not initially enabled on Windows 2008 R2; so Boxstarter needed to enable it before it could copy over the Boxstarter modules and local packages.

[WIN-HNB91NNAB2G]Boxstarter: Installing package 'NugetPackageExplorer'
[WIN-HNB91NNAB2G]Boxstarter: Disabling Automatic Updates from Windows Update
[WIN-HNB91NNAB2G]Boxstarter: Downloading .net 4.5...
[WIN-HNB91NNAB2G]Boxstarter: Installing .net 4.5...
[WIN-HNB91NNAB2G]Boxstarter: Chocolatey not instaled. Downloading and installing...

[WIN-HNB91NNAB2G]Boxstarter: Enabling Automatic Updates from Windows Update
[WIN-HNB91NNAB2G]Boxstarter: Restart Required. Restarting now...
Boxstarter: Waiting for WIN-HNB91NNAB2G to sever remote session...
Boxstarter: Waiting for WIN-HNB91NNAB2G to respond to remoting...

Next is more activity that we did not see on Server 2012. Server 2008 R2 comes with .Net 2.0 installed. Chocolatey needs at least 4.0 and Boxstarter will install v4.5 if v4.0 is not installed since v4.5 is an “in place upgrade” from 4.0 and thus includes 4.0. After installing .Net4.5 and Chocolatey, there is a pending reboot. Boxstarter needs to reboot the VM before proceeding with the install in order to reduce the risk of a failed install.

The remainder of the Server 2008 R2 install is identical to the Server 2012 install and so we will not examine the rest of the output.

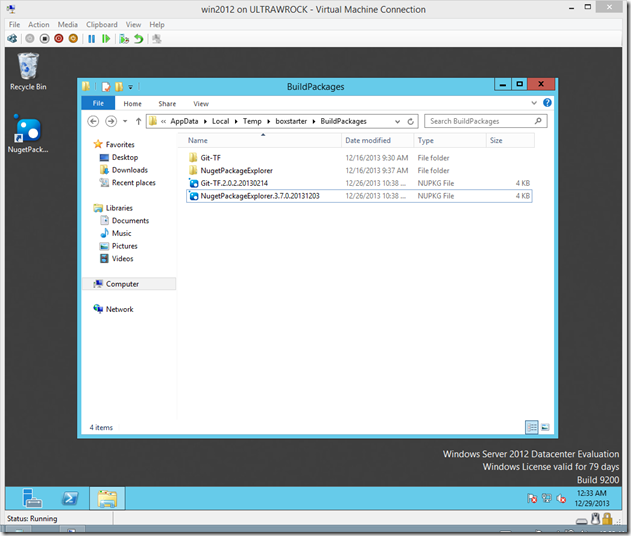
Now your VMs should have the NugetPacketExplorer installed and all *.Nupkg files should be associated with that application.

image


Creating Checkpoints

In the Enable-BoxstarterVM call we saw above, we restored to a known clean state that we had previously saved. However, we can also have Boxstarter create the clean state. In the example we used above, we hade a checkpoint named “fresh” that Boxstarter restored. If that checkpoint did not exist, Boxstarter would have created one just after exiting Enable-BoxstarterVM.

Rolling package testing into Continuous Integration

This post shows you how you can use Boxstarter and Hyper-V to create an environment where you can easily test package development. However, wouldn’t it be great to take this to the next level and have your package checkins automatically kickoff a package install on a Azure or AWS VM? My next post will explore just that which will be possible when I release the Windows Azure integration.