Adventures in sysprep and the failed quest for disk cleanup on server 2012 R2 by Matt Wrock

A couple months ago I wrote a post about creating light weight windows vagrant boxes. For those unfamiliar with vagrant, a "Vagrant Box" is essentially a VM image and vagrant provides a rich plugin ecosystem that allows one to consume a "box" from different clouds and hypervisors and also use a variety of provisioning technologies to build out the final instance. My post covered how a windows image is prepared for vagrant and also discussed several techniques for making the image as small as possible. Last week I set about updating a windows vmware template using many of those same optimizations but when it came time to sysprep the image, alas it was not a tear free process.

This post will cover:

  • gotchas when it comes to sysprepping windows images
  • Troubleshooting sysprep failures
  • public mourning of the loss of our good friend, cleanmgr.exe, on server 2012 R2

What is sysprep?

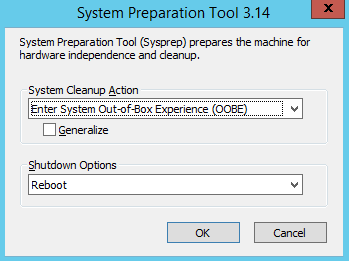
Sysprep is a command line tool that prepares a windows instance to be "reconsumed." It can take different command line arguments which will produce different flavors of output. My use of the tool and the one covered by this post is to prepare a base windows image to be deployed from VMWare infrastructure. This often involves the use of the /generalize switch which strips a windows OS of its individuality. It removes things like hostname, IP, user SIDs and even geographical association. You can also provide sysprep a path to an unattend file, also known as an answer file, that can contain all sorts of setup metadata such as administrator credentials, startup script, windows product key and more. Here is an example:

<?xml version="1.0" encoding="utf-8" ?>
<Unattend>
   <UserData>
      <!--This section contains elements for pre-populating user information and personalizing the user experience-->
      <AdminPassword Value="TG33hY" StrongPassword="No" EncryptedPassword="No"/>
      <FullName Value="Cookie Jones" />
      <ProductKey Value="12345-ABCDE-12345-ABCDE-12345" />
   </UserData>
   <DiskConfig>
      <!--This section contains elements for pre-populating information about disk configuration settings-->
      <Disk ID="0">
         <CreatePartition />
      </Disk>
   </DiskConfig>
   <SystemData>
      <RegionalSettings>
         <!--This section contains elements for selecting regional and language settings for the user interface-->
         <UserInterface Value="12" />
      </RegionalSettings>
   </SystemData>
</Unattend>

This has the advantage of preparing a fresh install that does not require the user to manually input a bunch of information before logging on and being productive.

You might prep the os with this file by running:

C:\windows\system32\sysprep\sysprep.exe /generalize /oobe /shutdown /unattend:myAnswerFile.xml

Sysprep without running sysprep

I dont often have the need to directly interact with sysprep.exe. Almost all of my dealings with it have been through VMWare's customization tooling and API which allow me to provision windows machines from ruby code that instruct VMWare how to perform sysprep and assemble the answer file. Here is an example of working with the ruby based vmware API, rbvmomi, to programatically construct the answer file:

def windows_prep_for(options, vm_name)
  cust_runonce = RbVmomi::VIM::CustomizationGuiRunOnce.new(
    :commandList => [
      'winrm set winrm/config/client/auth @{Basic="true"}',
      'winrm set winrm/config/service/auth @{Basic="true"}',
      'winrm set winrm/config/service @{AllowUnencrypted="true"}',
      'shutdown -l'])

  cust_login_password = RbVmomi::VIM::CustomizationPassword(
    :plainText => true,
    :value => options[:password])
  if options.has_key?(:domain)
    cust_domain_password = RbVmomi::VIM::CustomizationPassword(
      :plainText => true,
      :value => options[:domainAdminPassword])
    cust_id = RbVmomi::VIM::CustomizationIdentification.new(
      :joinDomain => options[:domain],
      :domainAdmin => options[:domainAdmin],
      :domainAdminPassword => cust_domain_password)
  else
    cust_id = RbVmomi::VIM::CustomizationIdentification.new(
      :joinWorkgroup => 'WORKGROUP')
  end
  cust_gui_unattended = RbVmomi::VIM::CustomizationGuiUnattended.new(
    :autoLogon => true,
    :autoLogonCount => 1,
    :password => cust_login_password,
    :timeZone => options[:win_time_zone])
  cust_userdata = RbVmomi::VIM::CustomizationUserData.new(
    :computerName => RbVmomi::VIM::CustomizationFixedName.new(
      :name => options[:hostname]
    ),
    :fullName => options[:org_name],
    :orgName => options[:org_name],
    :productId => options[:product_id])
  RbVmomi::VIM::CustomizationSysprep.new(
    :guiRunOnce => cust_runonce,
    :identification => cust_id,
    :guiUnattended => cust_gui_unattended,
    :userData => cust_userdata)
end

VMWare calls sysprep.exe for me on the base vm template image and can pass in a file like the one above to enable winrm, register the product key, setup the local administrator and domain join the final vm. This all works great except for when it doesn't.

When things go wrong either by calling sysprep.exe directly or via VMWare, its not immediately obvious what the error is. In fact I would say that it is immediately very confusing...and even worse sometimes it is not immediate at all. I wrote a post six months ago about how to troubleshoot unattended windows provisioning gone wrong. Here I want to look specifically at issues concerning disk cleanup.

Preparing for sysprep

Often the point of running sysprep is to be able to take a golden image and deploy that for use in many virtual instances.So you want to make sure that the image you are capturing is...well...golden. That might also mean, especially for windows, as small as possible. Since windows images are much larger than their linux counter parts and orders of magnitude larger than containers, its important to me that they be as small as possible at the outset so that an already drawn out provisioning time does not go even longer.

There are a few techniques that can be applied here and which ones will depend on the version of windows you are running. I'm focusing here on the latest released server version 2012 R2. I'd definitely encourage you to read my vagrant post that talks about some of the new features of component cleanup and features on demand that can shave many gigabytes off of your base image. Another tool that many use to purge useless files from their windows os is cleanmgr.exe. Many know this better as the little app that is launched from the "disk cleanup" button when viewing a disk's properties.

Enabling Disk Cleanup on windows server

Windows clients have this feature enabled by default but out of the box it is not present on server SKUs. The way to enable it is by adding the Desktop Experience feature. This would be done in powershell by running:

Add-WindowsFeature Desktop-Experience

The problem with this is that the Desktop-Experience brings alot of baggage with it that you do not typically need or want on a server. In fact, it will automatically enable two additional features:

  • Media Services
  • Ink and Handwriting Services

All around in files and registry size, this makes your OS footprint larger so there are typically two ways to deal with this.

Install, Cleanup, Uninstall

You want to have this be the last step of your image preparation process. Once everything is as it should be, you install the Desktop Experience, perform a required reboot, invoke cleanmgr.exe and dump as much as you can and then uninstall the feature along with the above two features it installed. Then finally, of course, reboot again.

Install cleanmgr.exe ala carte style

You dont need this feature just to run cleanmgr. While this is certainly not obvious, it is buried deep inside your windows folder even when the desktop experience is not enabled. This is even documented on Technet. Search for cleanmgr.exe  and cleanmgr.exe.mui inside of c:\windows\winSXS:

Get-ChildItem -Path c:\windows\winsxs -Recursive -Filter cleanmgr.exe
Get-ChildItem -Path c:\windows\winsxs -Recursive -Filter cleanmgr.exe.mui

This may return two or three versions of the same file. You'll probably want whichever has the highest versions. According to the above referenced Technet article, on server 2008 R2 these will be in:

C:\Windows\winsxs\amd64_microsoft-windows-cleanmgr_31bf3856ad364e35_6.1.7600.16385_none_c9392808773cd7da\cleanmgr.exe

C:\Windows\winsxs\amd64_microsoft-windows-cleanmgr.resources_31bf3856ad364e35_6.1.7600.16385_en-us_b9cb6194b257cc63\cleanmgr.exe.mui

They can simply be copied to c:\windows\system32 and c:\windows\system32\en-US respectively. While they wont be visible from the disk properties, you can still access them from the command line.

Two steps forward one step back on server 2012 R2

Server 2012 R2 has delivered some major enhancements for reducing the size of a windows os footprint. It provides commands for cleaning out installed updates and you can completely remove unused features from disk. Further, those parts of winSXS that are not in use are compressed. This is all great stuff but the problem is that because cleanmgr.exe is compressed, it cannot simply be copied out and run as is. Further, neither I nor anyone else on the internet can seem to extract it.

Its clearly compressed. While disabled, its about 82k and 213k afterwards. I tried using the compact commandline tool as well as winrar without luck.

One option is to do a mix of the above two approaches: Enable the feature. Once enabled, those two files are both expanded and moved to system32. Then copy them somewhere safe before disabling the feature. Now you could use these files either on this machine or another server 2012 R2 box...or not.

I have tried this and it works in so far as I can get cleanmgr.exe to pop its GUI dialog, but it appears crippled. Only a hand full of the usually available options are present:

Where are the error reports, the setup files, etc?

So what does this have to do with sysprep?

Go ahead and perform a sysprep after disabling the desktop experience feature.

A fatal error...hmm.

Troubleshooting sysprep

When things go wrong during a sysprep cycle, the place to look is:

c:\windows\system32\sysprep\panther\setupact.log

This file will almost always include a more instructive error as well as information as to what it was doing just before the failure which can help debug the issue. The error we get here is:

Package winstore_1.0.0.0_neutral_neutral_cw5n1h2txyewy was installed for a user, but not provisioned for all users. This package will not function properly in the sysprep image.

Sysprep will attempt to uninstall all windows store apps and here it is complaining that it cannot and one is still installed.

Lets just check to see what store apps are currently installed:

PS C:\Users\Administrator.WIN-DKAJ9Q1JK5N> Get-AppxPackage


Name              : winstore
Publisher         : CN=Microsoft Windows, O=Microsoft Corporation, L=Redmond, S=Washington, C=US
Architecture      : Neutral
ResourceId        : neutral
Version           : 1.0.0.0
PackageFullName   : winstore_1.0.0.0_neutral_neutral_cw5n1h2txyewy
InstallLocation   : C:\Windows\WinStore
IsFramework       : False
PackageFamilyName : winstore_cw5n1h2txyewy
PublisherId       : cw5n1h2txyewy
IsResourcePackage : False
IsBundle          : False
IsDevelopmentMode : False

Name              : windows.immersivecontrolpanel
Publisher         : CN=Microsoft Windows, O=Microsoft Corporation, L=Redmond, S=Washington, C=US
Architecture      : Neutral
ResourceId        : neutral
Version           : 6.2.0.0
PackageFullName   : windows.immersivecontrolpanel_6.2.0.0_neutral_neutral_cw5n1h2txyewy
InstallLocation   : C:\Windows\ImmersiveControlPanel
IsFramework       : False
PackageFamilyName : windows.immersivecontrolpanel_cw5n1h2txyewy
PublisherId       : cw5n1h2txyewy
IsResourcePackage : False
IsBundle          : False
IsDevelopmentMode : False

Ok. fine. We'll just delete them ourselves.

PS C:\Users\Administrator.WIN-DKAJ9Q1JK5N> Get-AppxPackage | Remove-AppxPackage
Remove-AppxPackage : Deployment failed with HRESULT: 0x80073CFA, Removal failed. Please contact your software vendor.
(Exception from HRESULT: 0x80073CFA)
error 0x80070032: AppX Deployment Remove operation on package winstore_1.0.0.0_neutral_neutral_cw5n1h2txyewy from:
C:\Windows\WinStore failed. This app is part of Windows and cannot be uninstalled on a per-user basis. An
administrator can attempt to remove the app from the computer using Turn Windows Features on or off. However, it may
not be possible to uninstall the app.
NOTE: For additional information, look for [ActivityId] cc6d4139-3ae8-0000-0447-6dcce83ad001 in the Event Log or use
the command line Get-AppxLog -ActivityID cc6d4139-3ae8-0000-0447-6dcce83ad001
At line:1 char:19
+ Get-AppxPackage | Remove-AppxPackage
+                   ~~~~~~~~~~~~~~~~~~
    + CategoryInfo          : WriteError: (winstore_1.0.0....l_cw5n1h2txyewy:String) [Remove-AppxPackage], IOException
    + FullyQualifiedErrorId : DeploymentError,Microsoft.Windows.Appx.PackageManager.Commands.RemoveAppxPackageCommand

Remove-AppxPackage : Deployment failed with HRESULT: 0x80073CFA, Removal failed. Please contact your software vendor.
(Exception from HRESULT: 0x80073CFA)
error 0x80070032: AppX Deployment Remove operation on package
windows.immersivecontrolpanel_6.2.0.0_neutral_neutral_cw5n1h2txyewy from: C:\Windows\ImmersiveControlPanel failed.
This app is part of Windows and cannot be uninstalled on a per-user basis. An administrator can attempt to remove the
app from the computer using Turn Windows Features on or off. However, it may not be possible to uninstall the app.
NOTE: For additional information, look for [ActivityId] cc6d4139-3ae8-0000-0f47-6dcce83ad001 in the Event Log or use
the command line Get-AppxLog -ActivityID cc6d4139-3ae8-0000-0f47-6dcce83ad001
At line:1 char:19
+ Get-AppxPackage | Remove-AppxPackage
+                   ~~~~~~~~~~~~~~~~~~
    + CategoryInfo          : WriteError: (windows.immersi...l_cw5n1h2txyewy:String) [Remove-AppxPackage], IOException
    + FullyQualifiedErrorId : DeploymentError,Microsoft.Windows.Appx.PackageManager.Commands.RemoveAppxPackageCommand

Ugh. We cant uninstall these? Nope. You cannot. So once you install the desktop experience feature, it cannot be fully uninstalled. The only way to sysprep this machine is to keep the desktop experience feature enabled.

Whether you sysprep via the VMWare tools or directly, you can now no longer run a successful sysprep without the desktop experience unless you start over with a new OS. I have scowered the internet for a work around have not found any. There are lots of folks complaining about this.

Its not as bad as it might seem

The fact of the matter is that I do not see this as being a horrendous show stopper at least not for my use case. By the time I run disk cleanup, there really is not that much to be purged. Far less than a gigabyte. This is because I am preparing a fresh os so there has not been much accumulation of cruft. The vast majority of disposable content I can now purge very thoroughly with the new DISM.exe command:

Dism.exe /online /Cleanup-Image /StartComponentCleanup /ResetBase

Worse case, I manually delete temp files and some of the other random junk lying around. Its unfortunate that we have lost cleanmgr.exe but all is not lost.

Exceeding the 3 sysprep limit

Another issue I hit with sysprep that threw me and prompted a fair amount of research was the limit of 3 sysprep runs from a single os install. It is true that you are limited to three but there is an easy workaround I found here. The limit manifests itself with another fatal error during sysprep and the following message in the log file:

RunExternalDlls:Not running DLLs; either the machine is in an invalid state or we couldn't update the recorded state, dwRet = 0x1f

According to the post mentioned above, the work around is to set the following reg keys:

HKEY_LOCAL_MACHINE\SYSTEM\Setup\Status\SysprepStatus\GeneralizationState\
CleanupState:2
GeneralizationState:7

Then run:

msdtc -uninstall
msdtc -install

and then reboot. I was able to get by by just setting the GeneralizationState property of HKEY_LOCAL_MACHINE\SYSTEM\Setup\Status\SysprepStatus\GeneralizationState to 7, but your mileage may vary.

Safely running windows automation operations that fail inside winrm or powershell remoting by Matt Wrock

Me and a couple colleagues engaging in our ceremonial preparation for running scheduled tasks. The robes chafe but not as bad as the tasks.

Me and a couple colleagues engaging in our ceremonial preparation for running scheduled tasks. The robes chafe but not as bad as the tasks.

In many ways I like windows powershell more than bash and even powershell remoting over SSH. Please don't hate me. However, in spite of some of the clever things you can do with treating remote sessions as objects and manipulating them as such in powershell, its all fun and games until you start getting HResults thrown in your face trying to do something you'd think was the poster child use case for remoting like installing windows updates on a remote machine.

In this post I'm going to discuss:

  • Some common operations, that I am aware of, that can cause one to get into trouble automating remotely on windows
  • Approaches for working around these issues
  • Using a tool like Boxstarter on  100% windows automation or the Boxstarter cookbook in chef runs on Test-KitchenChef Provisioning or Vagrant provisioning where WinRM is the transport mechanism

To be clear 95% of all things local can be done remotely without incident on windows if not more. This post gives voice to the remaining 5%.

Things that don't work

This may come as a surprise to those used to working over ssh where things pretty much behave just as they do locally, but in the world of remote shells on windows, there are a few gotchas that you should be aware of. Quickly here are the big ones:

  • Working with the windows update interfaces simply don't work
  • Accessing network resources like network shares, databases or web sites that normally leverage your current windows logon context will fail unless using the correct authentication protocol
  • Installing MSIs or other installers that depend on either of the above resources (SQL Server, most .Net Framework installers) will not install successfully
  • Accessing winrm client configuration information like max commands per shell and user, max memory per shell, etc. on windows OS versions below win 8/2012 result in Access Denied errors.

What does failure look like?

I can say this much. Its not pretty.

Windows update called in an installer

Lets try to install the .net framework v 4.5.2. I'm going to do this via a normal powershell remoting session on windows v 8.1 that ships with .net v 4.5.1 but if you are not on a windows box, you can certainly follow along by running this through the WinRM ruby gem or embedding it in a Chef recipe:

function Get-HttpToFile ($url, $file){
    Write-Verbose "Downloading $url to $file"
    if(Test-Path $file){Remove-Item $file -Force}
    $downloader=new-object net.webclient
    $wp=[system.net.WebProxy]::GetDefaultProxy()
    $wp.UseDefaultCredentials=$true
    $downloader.Proxy=$wp
    try {
        $downloader.DownloadFile($url, $file)
    }
    catch{
        if($VerbosePreference -eq "Continue"){
            Write-Error $($_.Exception | fl * -Force | Out-String)
        }
        throw $_
    }
}

Write-Host "Downloading .net 4.5.2.."
Get-HttpToFile `
  "http://download.microsoft.com/download/B/4/1/B4119C11-0423-477B-80EE-7A474314B347/NDP452-KB2901954-Web.exe"`
  "$env:temp\net45.exe"
Write-Host "Installing .net 4.5.2.."
$proc = Start-Process "$env:temp\net45.exe" `
  -verb runas -argumentList "/quiet /norestart /log $env:temp\net45.log"`
  -PassThru 
while(!$proc.HasExited){ sleep -Seconds 1 }

This should fail fairly quickly. A look at the log file - the one specified in the installer call (note that this will be output in html format and given an html extension) reveals the actual error:

Final Result:
Installation failed with error code: (0x00000005), "Access is denied."

If you investigate the log further you will find:

WU Service: EnsureWUServiceIsNotDisabled succeeded
Action: Performing Action on Exe at C:\b723fe7b9859fe238dad088d0d921179\x64-Windows8.1-KB2934520-x64.msu
Launching CreateProcess with command line = wusa.exe "C:\b723fe7b9859fe238dad088d0d921179\x64-Windows8.1-KB2934520-x64.msu" /quiet /norestart

Its trying to download installation bits using the Windows Update service. This not only occurs in the "web installer" used here but also the full offline installer as well. Note that this script should run without incident locally on the box. So quit your crying and just logon to your 200 web nodes and run this. What's the freaking problem?

So its likely that the .net version you plan to run is pre baked in your base images already, but what this illustrates is that regardless of what you are trying to do, there is no guarantee that things are going to work or even fail in a comprehensible manner. Even if everyone knows what wusa.exe is and what an exit code of 0x5 signifies.

No access to network resources

To quickly demonstrate this, I'll list the C:\ drive of my host computer from a local session using a Hyper-V console:

PS C:\Windows\system32> ls \\ultrawrock\c$


    Directory: \\ultrawrock\c$


Mode                LastWriteTime     Length Name
----                -------------     ------ ----
d----         1/15/2015   9:32 AM            chef
d----        12/12/2014  12:51 AM            dev
d----         9/10/2014   3:44 PM            Go
d----         11/5/2014   7:24 PM            HashiCorp
d----        12/10/2014  12:13 AM            Intel
d----        11/16/2014  11:10 AM            opscode
d----         11/4/2014   5:23 AM            PerfLogs
d-r--         1/10/2015   4:30 PM            Program Files
d-r--         1/17/2015   1:11 PM            Program Files (x86)
d----        12/11/2014  12:33 AM            RecoveryImage
d----        11/16/2014  11:40 AM            Ruby21-x64
d----        12/11/2014  10:26 PM            tools
d-r--        12/11/2014  12:31 AM            Users
d----        12/26/2014   5:24 PM            Windows

Now I'll run this exact same command in my remote powershell session:

[192.168.1.14]: PS C:\Users\Matt\Documents> ls \\ultrawrock\c$
ls : Access is denied
    + CategoryInfo          : PermissionDenied: (\\ultrawrock\c$:String) [Get-ChildItem], UnauthorizedAccessException
    + FullyQualifiedErrorId :
 ItemExistsUnauthorizedAccessError, Microsoft.PowerShell.Commands.GetChildItemCommand

ls : Cannot find path '\\ultrawrock\c$' because it does not exist.
    + CategoryInfo          : ObjectNotFound: (\\ultrawrock\c$:String) [Get-ChildItem], ItemNotFoundException
    + FullyQualifiedErrorId : PathNotFound,Microsoft.PowerShell.Commands.GetChildItemCommand

Note that I am logged into both the local console and the remote session using the exact same credentials.

It should be pretty easy to see how this could happen in many remoting scenarios.

Working around these limitations

To be clear, you can install .net, install windows updates and access network shares remotely on windows. Its just kind of like Japanese Tea Ceremony meets automation but stripped of beauty and cultural profundity. You are gonna have to pump out a bunch of boiler plate code to accomplish what you need.

What?...I'm not bitter.

Solving the double hop with CredSSP

This solution is not so bad but will only work for 100% windows scenarios using powershell remoting (as far as I know). That may likely work for most but breaks if you are managing windows infrastructure from linux (read on if you are).

You need to create your remote powershell session using CredSSP authentication:

Enter-PSSession -ComputerName MyComputer `
                -Credential $(Get-Credential user) `
                -Authentication CredSSP

This also requires CredSSP to be enabled on both the host (client) and guest (server):

Host:

Enable-WSManCredSSP -Role Client -DelegateComputer * -Force

This states I can delegate my credential via any server. I could also provide an array of hosts to allow.

Guest:

Enable-WSManCredSSP -Role Server -Force

If you are not in a windows domain, you must also edit the local Group Policy (gpedit from any command line) on the host and allow delegating fresh credentials:

After invoking the Group Policy Editor with gpedit.msc, navigate to Local Computer Policy/Computer Configuration/Administrative Templates/System/Credential Delegation. Then select Allow delegating fresh credentials in the right pane. In the following window, make sure this policy is enabled and specify the servers to authorize in the form of "wsman/{host or IP}". The hosts can be wild carded using domain dot notation. So *.myorg.com would effectively allow any host in that domain.

In case you want to automate the clicking and pointing, see this script I wrote that does just that.

Now here is a kicker: you cant use the Enable-WSManCredSSP cmdlet in a remote session. The server needs to be enabled locally. Thats ok. You could use the next work around to get around that.

Run locally with Scheduled Tasks

This is a fairly well known and somewhat frequent work around to get by this whole dilemma. I'll be honest here, I think the fact that one has to do this to accomplish such routine things as installing updates is ludicrous and I just don't understand why Microsoft does not remove this limitation. Unfortunately there is no way for me to send a pull request for this.

As we get into this, I think you will see why I say this. Its a total hack and a general pain in the butt to implement.

A scheduled task is essentialy a bit of code you can schedule to run in a separate process at a single time or interval. You can invoke them to run immediately or upon certain events like logon. You can provide a specific identity under which the task should run and the task will run as if that identity is logged on locally. There is full GUI interface for maintaining and creating them as well as a command line interface (schtasks) and also a set of powershell cmdlets in powershel v3.0 forward.

To demonstrate how to create, run and remove a task, I'll be pulling code from Boxstarter, an OSS project I started to address windows environment installs. Boxstarter uses the schtasks executable to support earlier powerhell versions (pre 3.0) before the cmdlets were created.

Creating a scheduled task

schtasks /CREATE /TN 'Temp Boxstarter Task' /SC WEEKLY /RL HIGHEST `
         /RU "$($Credential.UserName)" /IT `
         /RP $Credential.GetNetworkCredential().Password `
         /TR "powershell -noprofile -ExecutionPolicy Bypass -File $env:temp\Task.ps1" `
         /F

#Give task a normal priority
$taskFile = Join-Path $env:TEMP RemotingTask.txt
Remove-Item $taskFile -Force -ErrorAction SilentlyContinue
[xml]$xml = schtasks /QUERY /TN 'Temp Boxstarter Task' /XML
$xml.Task.Settings.Priority="4"
$xml.Save($taskFile)

schtasks /CREATE /TN 'Boxstarter Task' /RU "$($Credential.UserName)" `
         /IT /RP $Credential.GetNetworkCredential().Password `
         /XML "$taskFile" /F | Out-Null
        
schtasks /DELETE /TN 'Temp Boxstarter Task' /F | Out-Null

This might look a little strange so let me explain what this does (see here for original and complete script). First it uses the CREATE command to create a task that runs under the given identity to run whatever script is in Task.ps1. One important parameter here is /RL, the Run Level. This can be set to Highest or Limited. We want to run with highest privileges. Finally, note the use of /IT - interactive. This is great for debugging. If the identity specified just so happens to be logged into a interactive session when this task runs, any GUI elements will be seen by that user.

Now for some reason the schtasks CLI does not expose the priority to run the task with. However you can serialize any task to XML and then manipulate it directly. I found that this was important for Boxstarter which often invoked immediately after a fresh OS install. Things like Windows Updates or SCCM installs quickly take over and Boxstarter may get significantly delayed waiting for its turn so it at least asks to run with a normal priority.

After we save this file, that's not enough to simply change the priority. We now have to recreate a new task based on that XML using schtasks otherwise our identity is lost. Boxstarter will create this task once and then reuse it for any command it needs local rights for. It then deletes it in a finally block when it is done.

Running the Scheduled Task

I'm not going to cover all of the event driven mechanics or interval syntax since I am really referring to the running of ad hoc tasks. To actually cause the above task to run is simple:

$taskResult = schtasks /RUN /I /TN 'Boxstarter Task'
if($LastExitCode -gt 0){
    throw "Unable to run scheduled task. Message from task was $taskResult"
}

Since schtasks is a normal executable, we check the exit code to determine if it was successful. Note that this does not indicate if the script that the task runs is successful, it simply indicates that the task was able to be launched. For all we know the script inside the task fails horribly. The /I argument informs RUN to run immediately.

I'm going to spare all the code details for another post, but boxstarter does much more than just this when running the task. At the least you'd want to know when the task ends and have access to output and error streams of that task. Boxstarter finds the process, pumps its streams to a file and interactively reads from those streams back to the console. It also includes hang detection logic in the event that the task gets "stuck" like with a dialog box and is able to kill the task along with all child processes. You can see that code here in its Invoke-FromTask command.

An example usage of that function is when Boxstarter installs .net 4.5 on a box that does not already have it:

if(Get-IsRemote) {
  Invoke-FromTask @"
    Start-Process "$env:temp\net45.exe" -verb runas -wait `
      -argumentList "/quiet /norestart /log $env:temp\net45.log"
"@
}

This will block until the task completes and ensure stdout is streamed to the console and stderr is captured and bubbled back to the caller.

The Boxstarter cookbook for x-plat use

I developed Boxstarter with a 100% windows world in mind. That was my world then but my world is now mixed. I wanted to leverage some of the functionality in boxstarter for my chef runs without rewriting it (yet). So I created a Chef Boxstarter Cookbook that could install the powershell modules on a converging chef node and convert any block of powershell in a recipe into a Boxstarter "package" (a chocolatey flavored package) that can run inside of a boxstarter context within a chef client run. This can be placed inside a client run launched from Test-Kitchen or Chef-Provisioning both which can run via WinRM on a remote node. One could also use it to provision vagrant boxes with the chef zero provisioner plugin.

Here is an example recipe usage:

include_recipe 'boxstarter'
default['boxstarter']['version'] = "2.4.159"

boxstarter "boxstarter run" do
  password default['my_box_cookbook']['my_secret_password']
  disable_reboots false
  code <<-EOH
    Enable-RemoteDesktop
    Disable-InternetExplorerESC
    
    cinst console2
    cinst fiddler4
    cinst git-credential-winstore
    cinst poshgit
    cinst dotpeek

    Install-WindowsUpdate -acceptEula
  EOH
end

You can learn more about boxstarter scripts at boxstarter.org but they can contain ANY powershell and have the chocolatey modules loaded so all chocolatey commands exist and also expose some custom boxstarter commands for customizing windows settings (note the first two commands) or installing updates. Boxstarter will detect pending reboots and unless asked otherwise, it will reboot upon detecting a pending reboot - bad for production nodes but great for a personal dev environment.

A proof of concept and a bit rough

The boxstarter cookbook is still rough around the edges. It does what I need it to do and I have not invested much time in it. The output handling over WinRM is terrible and it needs more work making sure errors are properly bubbled up.

At any rate, this post is not intended to be a plug for boxstarter but it demonstrates how to get around the potential perils one may encounter inside of a remote windows session either in powershell directly or from raw WinRM from linux.

Installing user gems using chef by Matt Wrock

In my experience installing server infrastructure using Chef, I usually use the chef_gem resource to install a gem that's needed in order to orchestrate the setup process. These are gems that are consumed by chef, or a chef resource to converge a node. However last night I was editing a chef recipe that's included in a chef_workstation cookbook that my team at CenturyLink Cloud uses for provisioning developer vagrant boxes and our TeamCity build agents. I have bloged about that in more detail here. The recipe I was working on is responsible for installing all of the gems we use in our chef dev process. They include both publicly available knife plugins and internally authored tools as well. These gems are consumed by the user of the vagrant box and not chef directly.

The bash force approach

This was one of the first cookbooks we created when we had limited knowledge of chef, ruby and how gems worked in general - alas our knowledge still has limits but they are much less restrictive. So this recipe looked something like this:

bash "install chef gems" do
  code <<-EOS
    su - #{node["chef_workstation"]["user"]} -c "chef gem install my-gem-1"
    su - #{node["chef_workstation"]["user"]} -c "chef gem install my-gem-2"
    su - #{node["chef_workstation"]["user"]} -c "chef gem install my-gem-3"
  EOS
end

As you can see we were just running this via bash. Really this is fine and it worked. There is alot to be said for something that works. When we were putting this cookbook together we found that using chef_gem or gem_package installed the gems into the root user's directory making them inaccesible to the vagrant user. So using su was our workaround.

Recently we started using Nexus as an internal gem repository that seems to have slightly different install behavior from rubygems or artifactory. The former repositories would always install the latest gem assuming we had no constraints. Nexus would not install anything if any version of the requested gem was already installed. This did not work well for our internal gem workflow where we expect a vagrant provision to always install the latest gem.

Using gem_package

My first thought was to use the raw ruby gem modules to check for updates, install if the gem was missing or run an update if there was a newer version. That could have worked but it just seemed like I must be reinventing a wheel so I revisited the gem_package docs. Not sure why, but I didn't find anything meeting my needs on StackOverflow or the other google results I was turning up.

After reviewing the docs and a couple of initial failed attempts I landed on the right attribute values that yielded what worked:

%w[clc-gem1 clc-gem2 clc_gem-amazing].each do |gem|
  gem_package gem do
    source node["clc_nexus"]["repo"]["localgems"]
    gem_binary "/opt/chefdk/embedded/bin/gem"
    options "--no-user-install"
    action :upgrade
  end
end

The key attributes here are gem_binary and options. Because I lean toward the idiot side of the intelligence spectrum, I had initially written off the gem_binary attribute thinking it was pointing to where to install binary gems. Nope, its intended to point to the location of the gem bin you want to use. Handy when you have multiple ruby installs. We use the chefdk on our vagrant boxes so that's where I point the gem_binary attribute.

The other not so obvious thing to add is the --no-user-install option. Since chef is running as root, if this is not specified, the gems are installed in /home/root. By specifying --no-user-install, the gems are installed in the shared ruby gems location. This may not be ideal and I'm sure there must be a way to get it in the vagrant user directory, but for the purposes of our vagrant environments, this works well.